!! मुंग की खिचड़ी !!

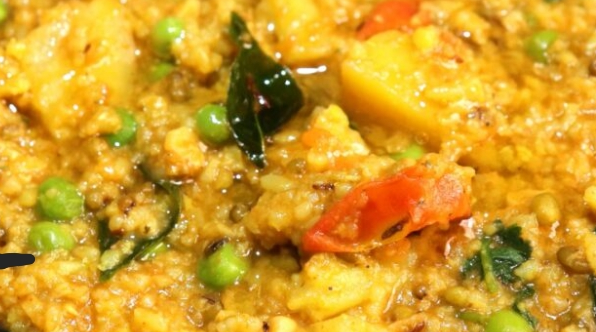
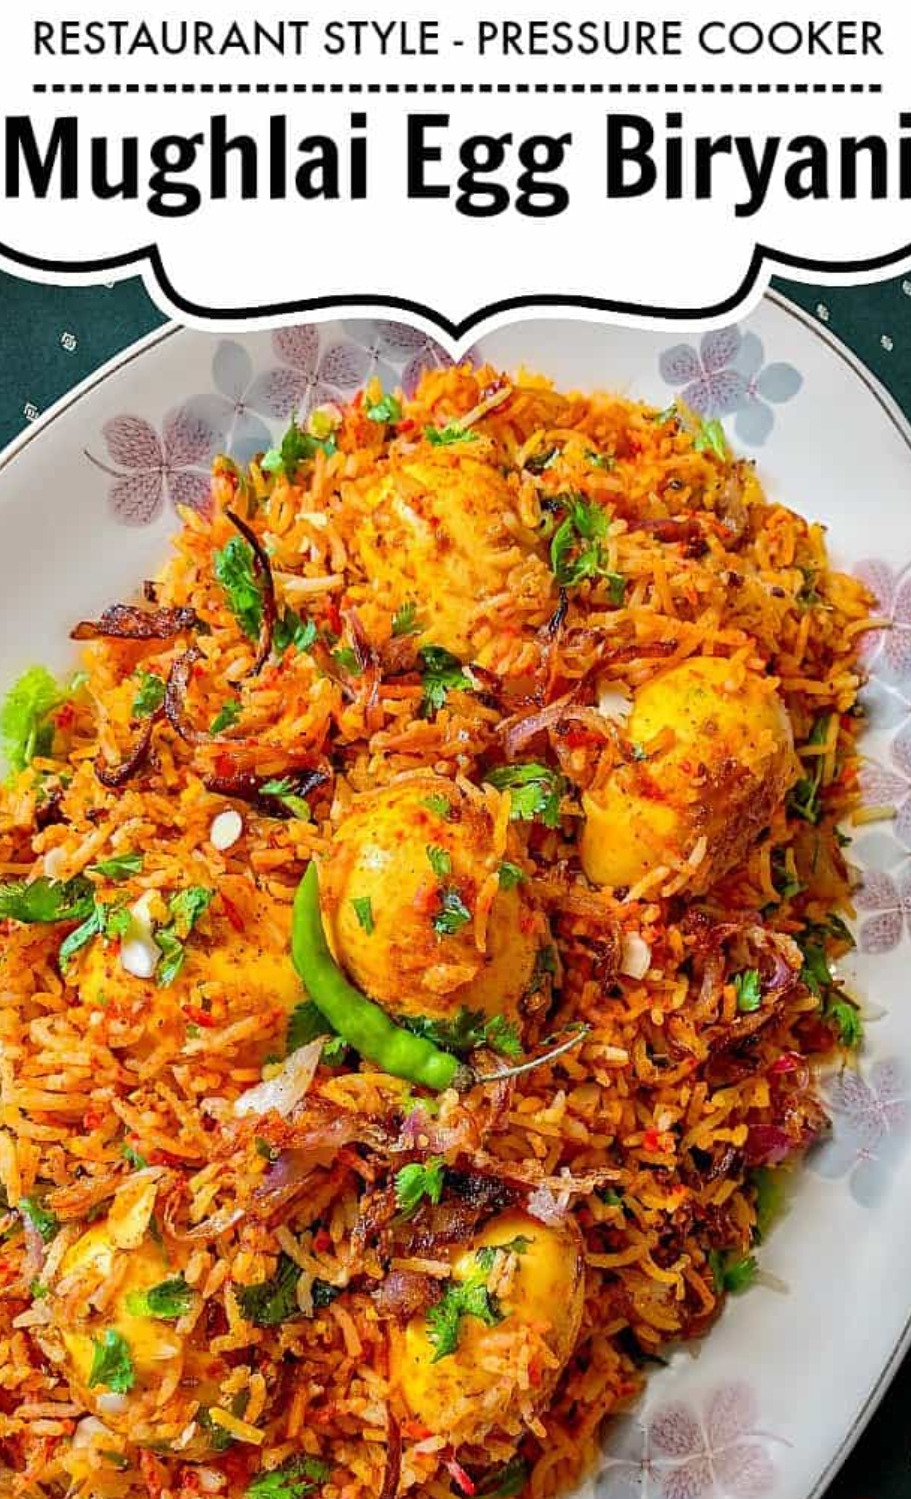
मूंगदाल की खिचड़ी खाने में तो बहुत ही हेल्दी होते हैं क्योंकि इसमें बहुत ज्यादा तेल मसाले नहीं लगते हैं। वैसे तो खिचड़ी आप सब चावल, दाल या फिर सब्जियों वाली तो घर पर जरूर बनाए होंगे, लेकिन आज आप का 'राजपुत' साबुत हरे मूंग दाल खिचड़ी की रेसिपी लेकर आए हैं। यह खिचड़ी भी खाने में बहुत ही हेल्दी और पौष्टिक होता है और इसको बनाना भी बहुत ही आसान है जितने समय में आप बाकी सारे खिचड़ी को बनाते होंगे, उतने समय में यह खिचड़ी भी बनकर तैयार हो जाता है। लेकिन यह हरे मूंग की दाल की खिचड़ी खाने में बहुत ही स्वादिष्ट होते हैं।

Ingredients सामाग्री –

  • Saabut Moong साबुत मूंग दाल – 200gm
  • Rice चावल – 100gm
  • Mustard oil सरसो तेल – 1 tbsp
  • Black cardamom काली इलायची – 1
  • Chopped onion प्याज – 1
  • Green chilly हरी मिर्च – 2
  • Coriander powder धनिया पाउडर – 1 tsp
  • Turmeric powder हल्दी और – 1 tsp
  • Cauliflower गोभी – 200gm
  • Raw potato कच्चे आलू – 2
  • Water पानी – 1 ltr
  • Salt नमक – 1 tsp to taste

Masala ingredients for khichdi मसाला सामग्री खिचड़ी के लिए –

  • Desi ghee देशी घी – 1 tbsp
  • Heeng हींग – 1/4 tsp
  • Cumin seeds जीरा – 1 tsp
  • Chopped garlic लहसुन – 1 tsp
  • Grated ginger कद्दूकस अदरक – 1 tsp
  • Some curry leaves कुछ करी पत्ता
  • Chopped tomato टमाटर – 2
  • Red chilly powder लाल मिर्च पाउडर – 1 tsp
  • Garam masala powder गरम मसाला पाउडर – 1 tsp
  • Salt नमक – 1/2 tsp to taste
  • Green pea हरी मटर – 100gm
  • Some coriander leaves कुछ हरी धनिया पत्ती

साबुत मूंग दाल की खिचड़ी बनाने की विधि (How to make Sabut moong dal khichdi recipe) –

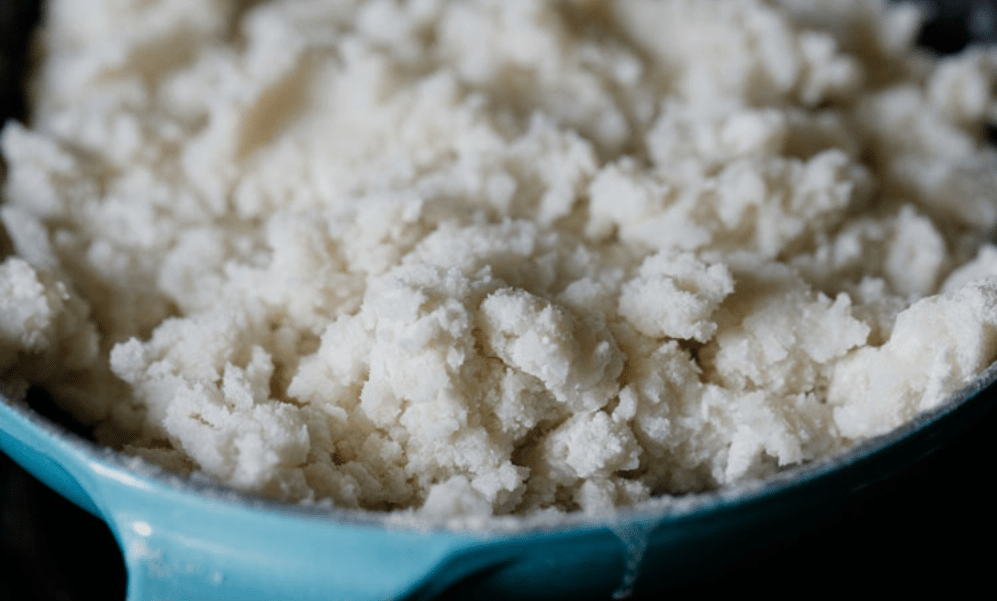
१ :- खिचड़ी बनाने के लिए सबसे पहले साबुत मूंग दाल को 8 से 10 घंटे या फिर एक रात भर के लिए पानी में भिगो कर रखें। जिससे मूंग दाल अच्छे से पानी में फूल जाए।

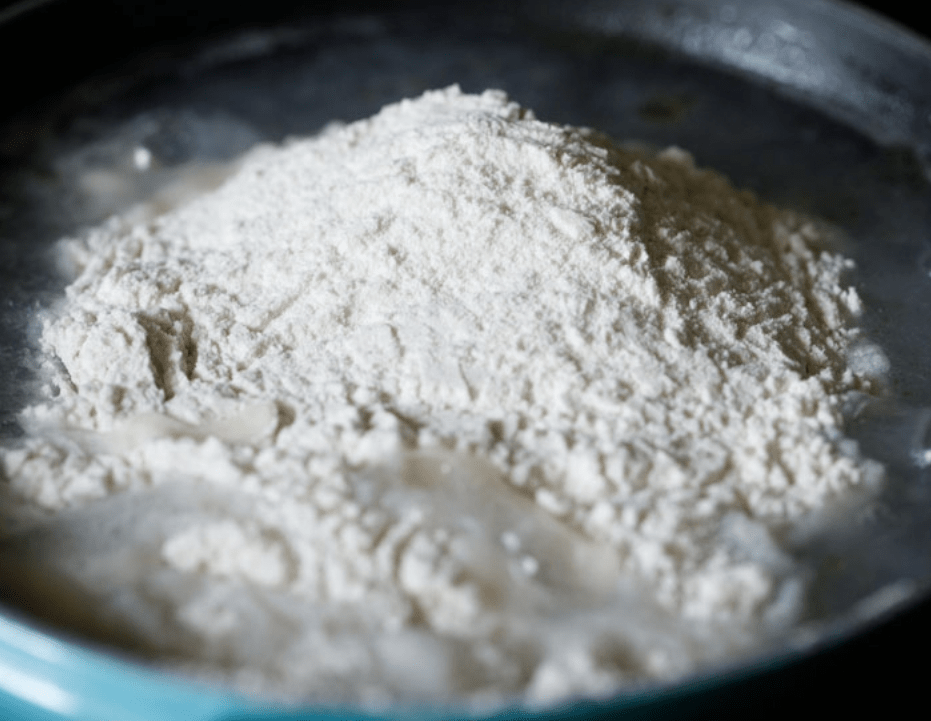
२ :- अब एक बर्तन में आधा कप चावल डालकर इसे दो से तीन बार साफ पानी से अच्छे से धो लें। खिचड़ी के लिए चावल को भिगोकर रखने की जरूरत नहीं है केवल इसे पानी से अच्छे से धोएं।

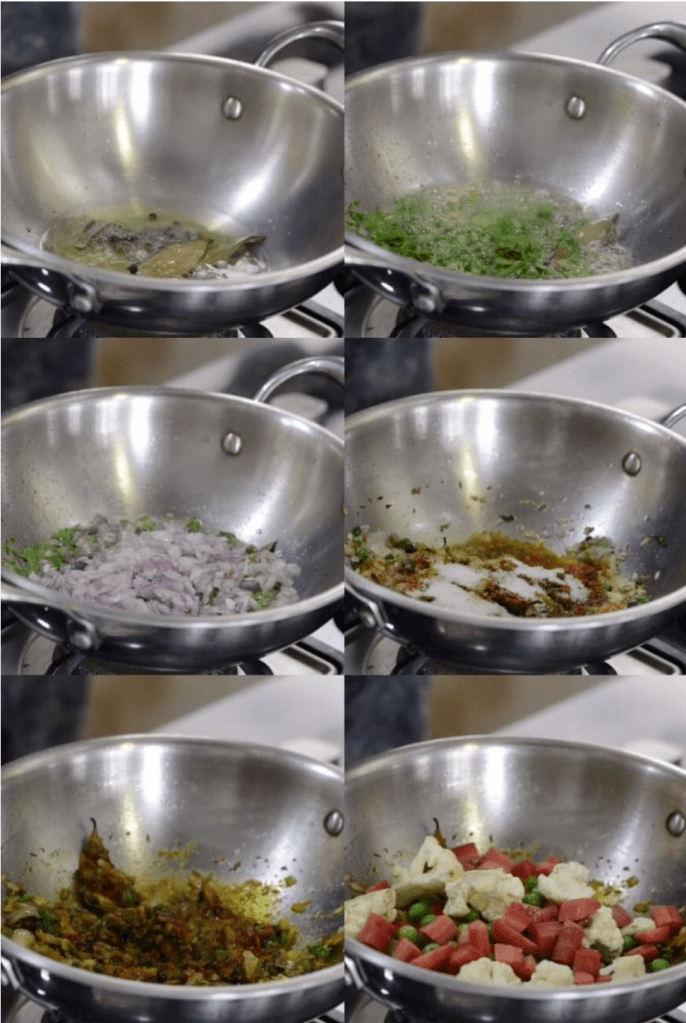
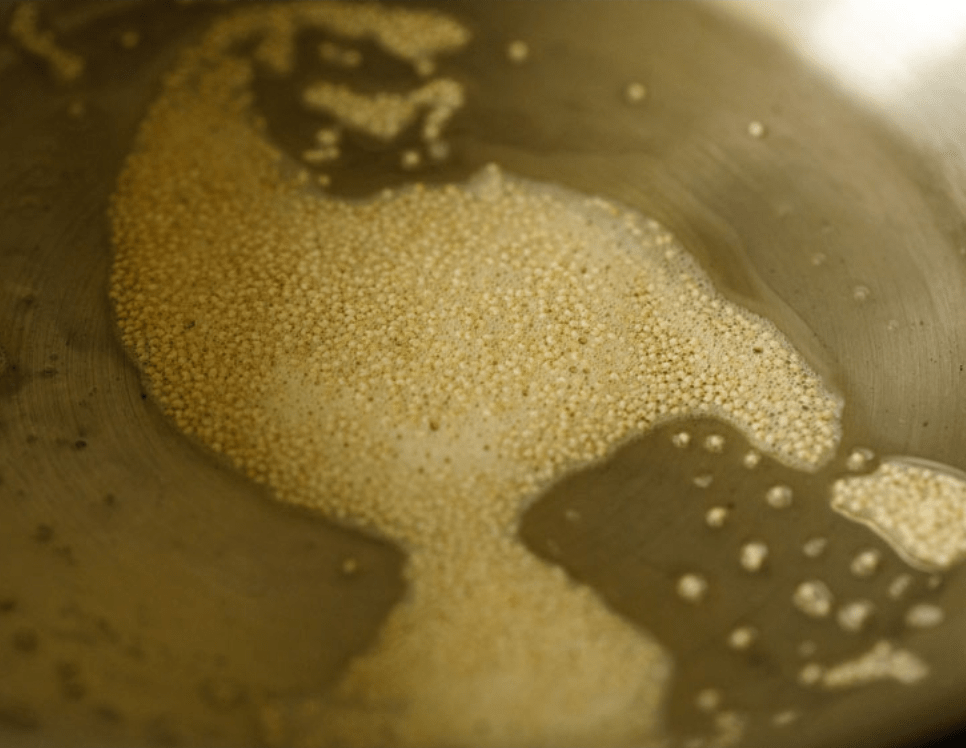
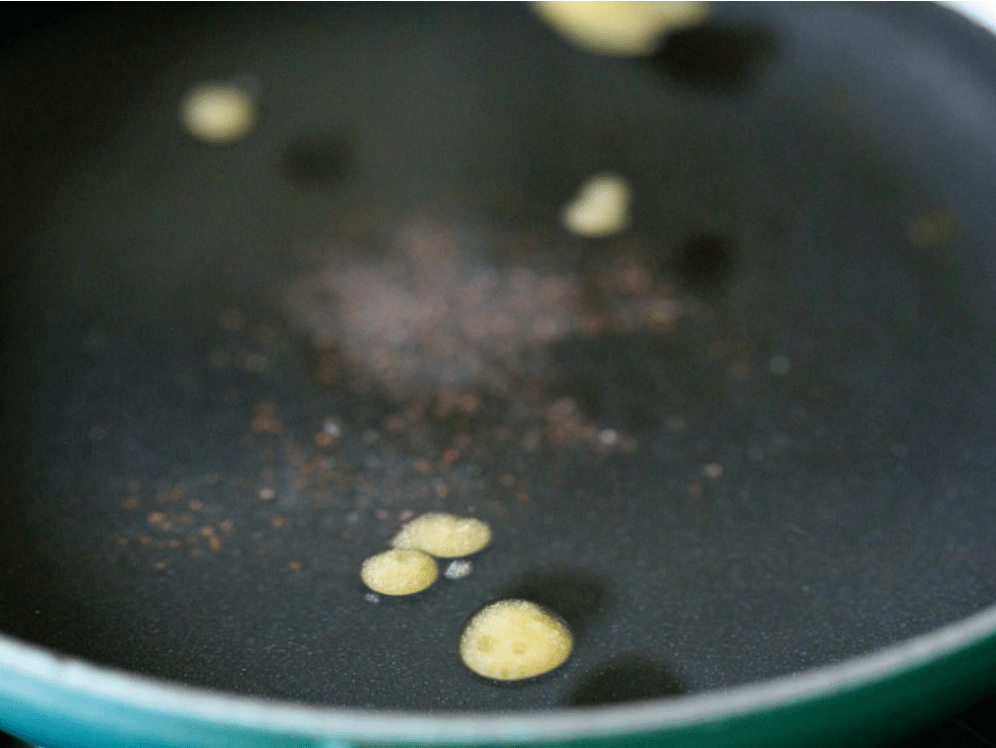
३ :- अब गैस पर कुकर को रखें और इसमें 1 बड़े चम्मच सरसों का तेल डाल कर अच्छे से गर्म करें।

५ :- तेल गरम होने के बाद इसमें एक काली इलायची (दरदरा कूटा हुआ) को डालकर मिलाएं और फिर इसमें एक कटा हुआ प्याज डालकर इसे हल्का नरम होने तक भूनें।

६ :- प्याज को भूनने के बाद इसमें दो कटी हुई हरी मिर्च, एक छोटी चम्मच धनिया पाउडर और एक छोटी चम्मच हल्दी पाउडर डालकर मिलाएं।

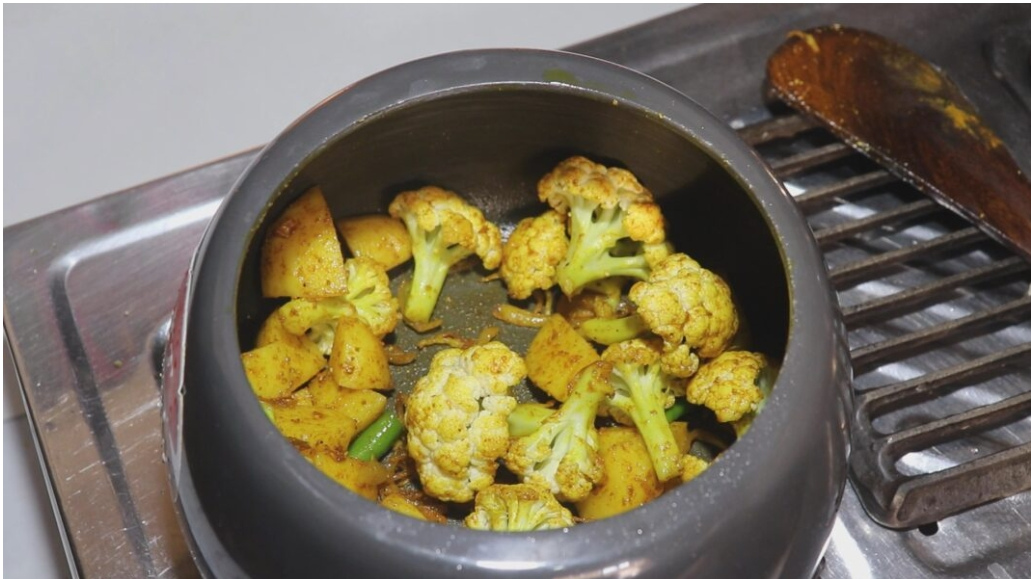
७ :- फिर कुकर में एक कटा हुआ फूलगोभी और दो कटा हुआ कच्चा आलू डाल कर अच्छे से मसाले में मिला लें, जिससे मसाले आलू गोभी पूरी तरह से लिपट जाएं।

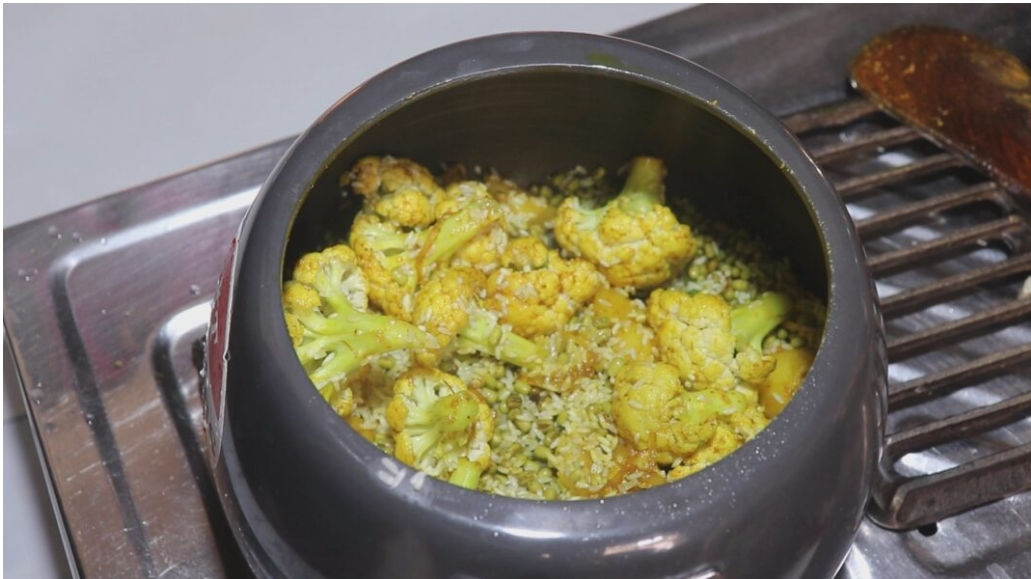
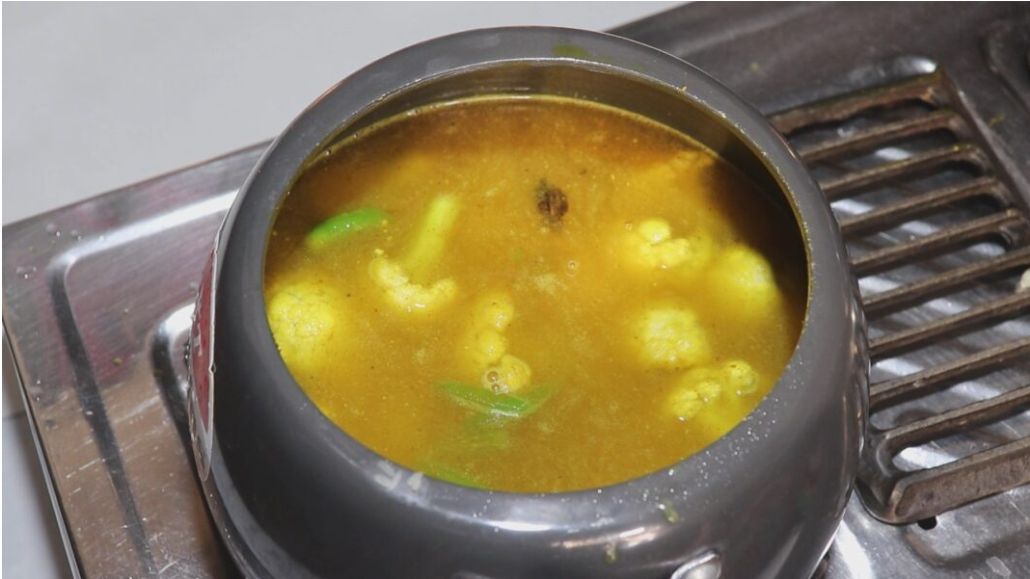
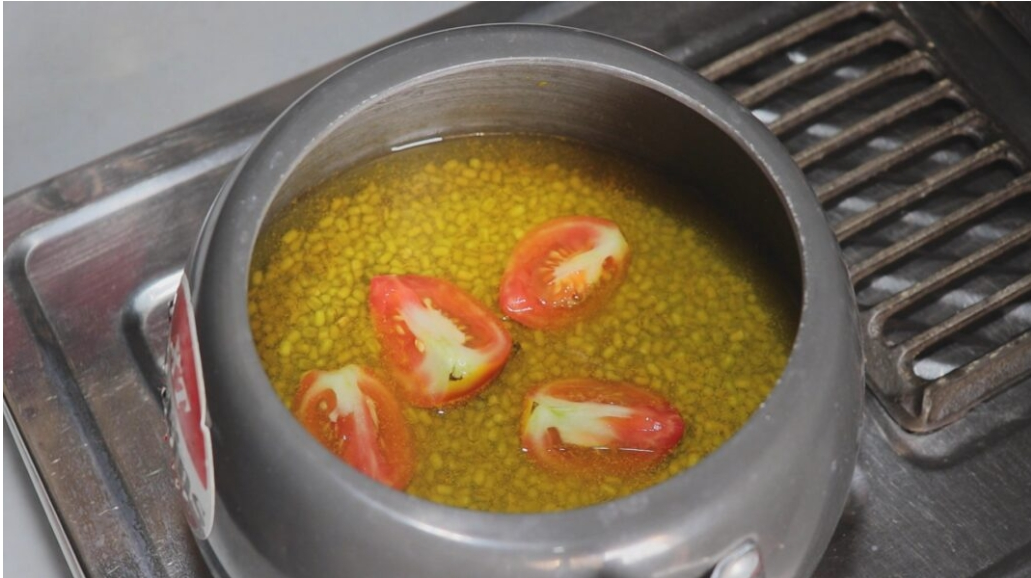
८ :- मसाले में आलू गोभी को मिलाने के बाद अब इसमें भीगा हुआ साबुत मूंग और चावल को डालकर मिलाएं और फिर इसमें 5 कप पानी, एक छोटी चम्मच नमक स्वाद अनुसार डालकर अच्छे से मिलाएं।

९ :- इसके बाद कुकर के ऊपर ढक्कन लगाकर खिचड़ी को तेज आंच पर चार सीटी आने तक पकाएं।

१० :- कुकर के 4 सीटी बजने के बाद कुकर को गैस से हटा कर एक किनारे ठंडा होने के लिए रख दें और तब तक खिचड़ी के लिए मसाले को तैयार कर लीजिए।

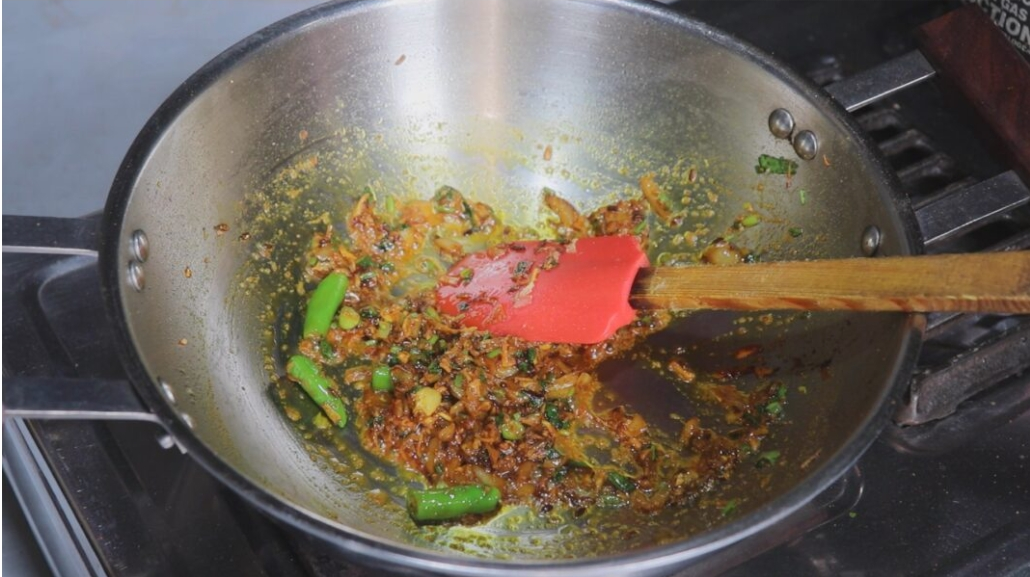
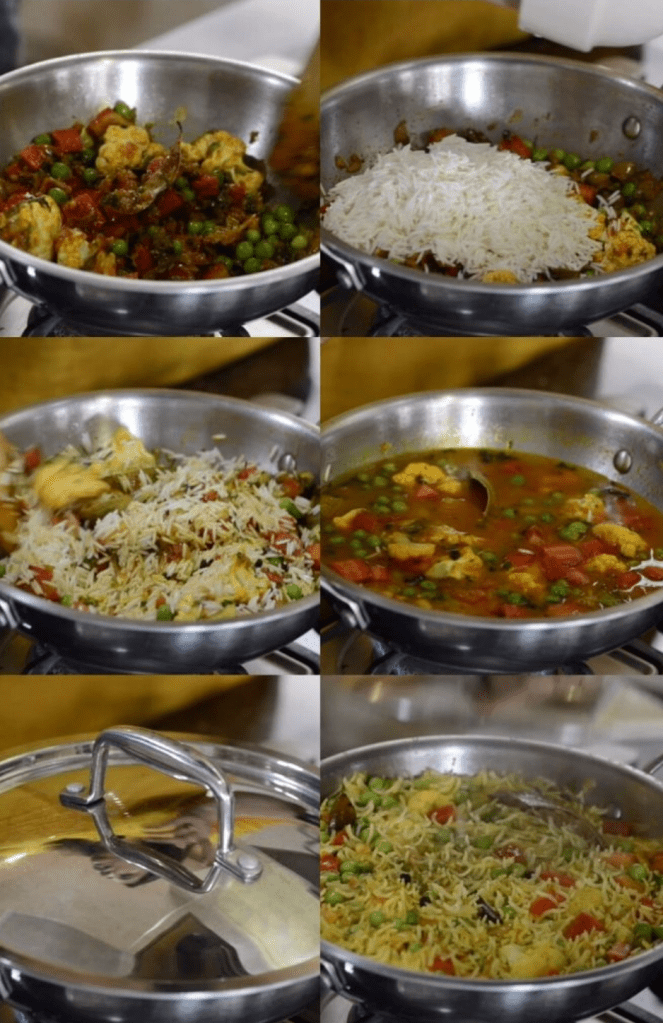
११:- अब गैस पर कड़ाही को रखकर इसमें एक बड़े चम्मच देसी घी डालकर गर्म करें।

१२:- घी गर्म होने के बाद इसमें एक चौथाई छोटा चम्मच हींग और एक छोटी चम्मच जीरा डालकर अच्छे से भूनें।

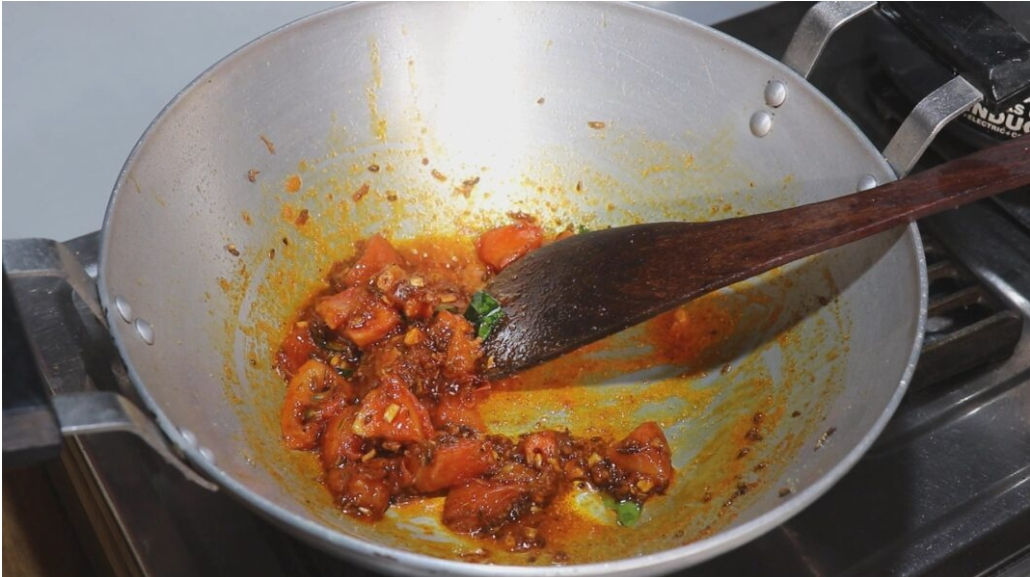
१३ :- इसके बाद इसमें थोड़े से बारीक कटे हुए लहसुन और एक चम्मच कद्दूकस किया हुआ अदरक डालकर बराबर चलाते हुए हल्के सुनहरे रंग में भूनें, जिससे लहसुन और अदरक में कच्चापन ना रहे।

१४ :- लहसुन अदरक भूनने के बाद इसमें थोड़ा सा करी पत्ता और दो कटा हुआ टमाटर डालकर मिलाएं।

१५ :- फिर इसमें एक छोटी चम्मच लाल मिर्च पाउडर, एक छोटी चम्मच गरम मसाला पाउडर, आधी छोटी चम्मच नमक स्वादानुसार डालकर अच्छे से टमाटर मिलाते हुए 1 से 2 मिनट तक पकाएं, जिससे टमाटर गलकर मसाले के साथ पक जाए।

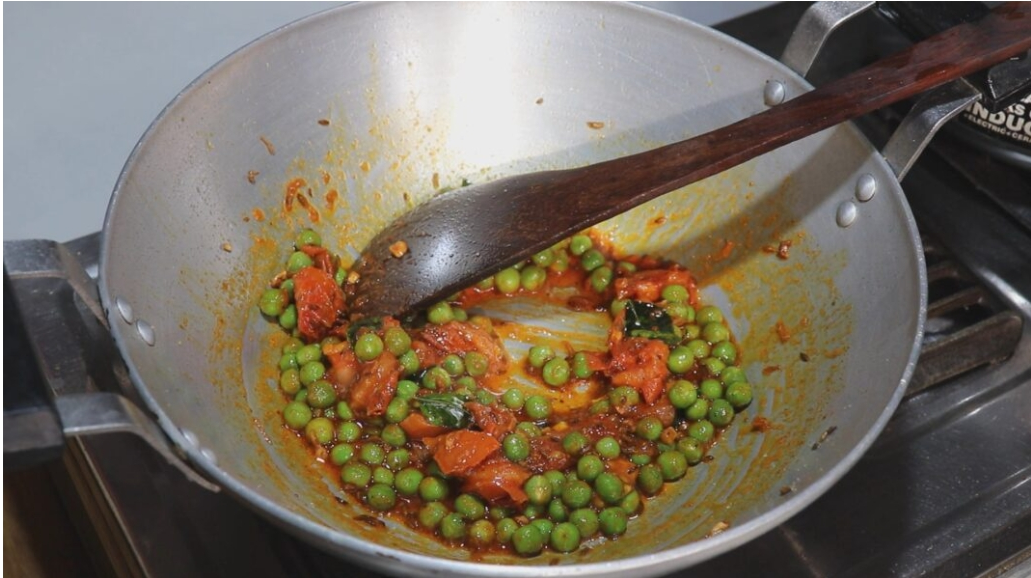
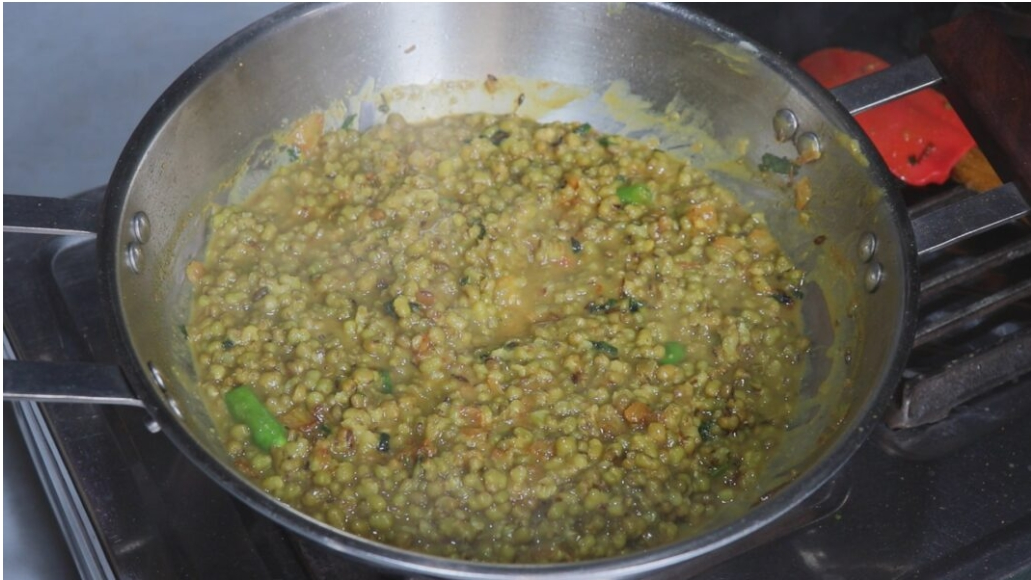
१६ :- इसके बाद मसाले में आधा कप हरी मटर डालकर अच्छे से मिलाएं। खिचड़ी के लिए मटर आप छिलके वाली या फिर फ्रोजन मटर कोई भी ले सकते हैं।

१७ :- इसके बाद अब मसाले में खिचड़ी को डालें और इसे धीमी आंच पर अच्छे से मसाले में मिला लीजिए। खिचड़ी और मसाले दोनों पके हैं इसलिए इसे मसाले में मिलाने के बाद पकाने की जरूरत नहीं है केवल खिचड़ी और मसाले को अच्छे से मिला लें।

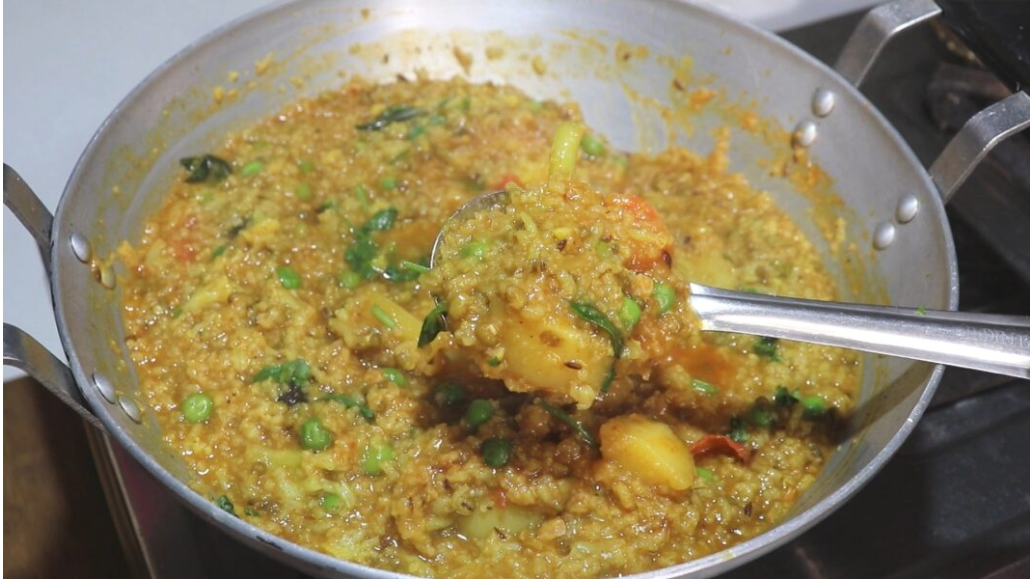
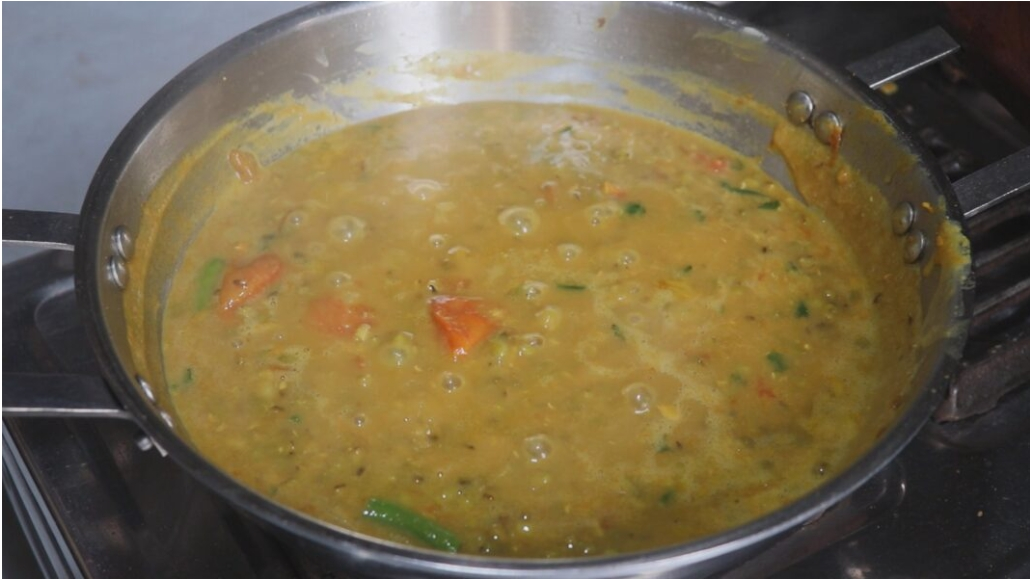
१८ :- इसके बाद गैस को बंद करें और खिचड़ी में थोड़ा सा बारीक कटा हुआ हरा धनिया मिलाएं।

१९ :- अब साबुत हरे मूंग की दाल खिचड़ी बन कर तैयार है इस तरह से मूंग दाल खिचड़ी आप घर पर कभी भी लंच या डिनर में बनाकर खा सकते हैं, यह खिचड़ी भी खाने में बहुत ही हेल्दी और पौष्टिक होता है।

सुझाव (Suggestion)-

खिचड़ी बनाने के लिए बासमती चावल या फिर साधारण चावल आप कोई भी चावल ले सकते हैं।

Contact Us

!! Moong Dal Tadka !!

If you want to avoid heartache, fall in love with food. It’ll never break your heart.

भोजन में सबसे ज्यादा लोग दाल और चावल खाना पसंद करते हैं क्योंकि दाल चावल बहुत ही हल्का फुल्का भोजन है। अगर आप रोज-रोज एक ही दाल बना कर हो गए हैं बोर तो एक बार इस तरीके से आप साबुत मूंग की दाल घर पर बना कर खाएं। साबुत मूंग तो बहुत ही हेल्दी और लाभदायक होता हैं और साबुत मूंग की दाल भी बनाने में उतना ही समय लगता है जितना कि अरहर, उड़द की दाल बनाने में लगते हैं। लेकिन खाने में यह दाल बहुत ही स्वादिष्ट होता है।

Ingredients सामाग्री –

  • Soaked moong मूंग दाल – 1/2 cup
  • Turmeric powder हल्दी पाउडर – 1/2 tsp
  • Salt नमक – 1 tsp to taste
  • Chopped tomato कटे हुए प्याज – 1
  • Desi ghee देशी घी – 1 tbsp
  • Cumin seeds जीरा – 1 tsp
  • Heeng हींग – 1/4 tsp
  • Chopped onion कटे हुए टमाटर – 1
  • Grated ginger garlic लहसुन अदरक पेस्ट – 1 tsp
  • Salt नमक – 1/ 2 tsp
  • Green chilly हरी मिर्च – 2
  • Coriander powder धनिया पाउडर – 1/2 tsp
  • Turmeric powder हल्दी पाउडर – 1/4 tsp
  • Red chilly powder लाल मिर्च पाउडर – 1/4 tsp
  • Some coriander leaves कुछ हरी धनिया पत्ती

Tadka तड़का –

  • Desi ghee देशी घी – 1 tbsp
  • Cumin seeds जीरा – 1 tsp
  • Dry red chilly सुखी लाल मिर्च – 2
  • Kashmiri red chilly powder कश्मीरी लाल मिर्च – 1/4 tsp

साबुत मूंग की दाल बनाने की विधि (How to make moong dal tadka) –

दाल बनाने के लिए सबसे पहले साबुत मूंग को पानी में 6 से 7 घंटे के लिए भिगो कर रखें।

जब दाल पानी में अच्छे से फूल जाए तब इसे साफ पानी से दो तीन बार अच्छे से धो लीजिए।

अब गैस पर कुकर को रखें और इसमें भीगे हुए साबुत मूंग, एक कटा हुआ टमाटर, आधी छोटी चम्मच हल्दी पाउडर, एक छोटी चम्मच नमक स्वाद अनुसार और दो कप पानी डालकर मिलाएं।

इसके बाद कुकर पर ढक्कन लगाकर मूंग को मध्यम आंच पर 4 सीटी आने तक पकाएं।

कुकर के चार सिटी बजने के बाद कुकर को गैस हटाकर ठंडा होने के लिए साइड में रख दें और फिर गैस पर कड़ाही को रखकर तब तक दाल के लिए मसाले को तैयार कर लीजिए।

कड़ाही में पहले 1 बड़े चम्मच देशी घी डाल कर अच्छे से गर्म करें।

घी गर्म होने के बाद इसमें एक छोटी चम्मच जीरा और एक चौथाई छोटी चम्मच हींग को डाल कर अच्छे से भूनें और फिर इसमें एक बारीक कटा हुआ प्याज डालकर मिलाएं।

इसके बाद इसमें एक चम्मच कद्दूकस किया हुआ अदरक और आधी छोटी चम्मच नमक स्वादानुसार डालकर प्याज में मिलाते हुए इसे हल्के सुनहरे रंग में होने तक भूनें, जिससे लहसुन अदरक में कच्चापन ना रहे।

प्याज लहसुन अदरक को सुनहरे रंग में भूनने के बाद इसमें दो कटी हुई हरी मिर्च, आधी छोटी चम्मच धनिया पाउडर, एक चौथाई छोटी चम्मच हल्दी पाउडर, एक चौथाई छोटा चम्मच लाल मिर्च पाउडर, थोड़ा सा बारीक कटा हुआ हरा धनिया और लगभग एक बड़े चम्मच पानी डालकर मसाले को हल्के मध्यम आंच पर अच्छे से प्याज मिलाते हुए 2 से 3 मिनट तक पकाएं, जिससे मसाले अच्छे से भूनकर पक जाए।

मसाले को पकाने के बाद अब इसमें कुकर में उबले हुए मूंग को डालकर मिलाएं।

फिर इसके बाद इसमें एक पानी डालकर अच्छे से मिलाकर दाल को एक उबाल आने तक पकाएं। जब दाल उबलने लगे तो समझ लीजिए दाल पक कर तैयार है।

दाल को पकाने के बाद अब इसे एक बर्तन में निकाल लीजिए और फिर दाल के लिए तड़का को तैयार करें।

तड़का पैन में पहले एक चम्मच देशी घी डाल कर अच्छे से गर्म करें।

घी गर्म होने के बाद इसमें एक छोटी चम्मच जीरा डालकर अच्छे से चटकने तक भूनें।

जीरा भुनने के बाद इसमें दो सुखी लाल मिर्च और एक छोटी चम्मच कश्मीरी लाल मिर्च पाउडर डालकर मिर्च को हल्का भूनें।

फिर इसके बाद दाल में तड़का को लगाएं और फिर दाल को चावल या रोटी के साथ खाने के लिए गरमा गरम सर्व करें।

  1. तड़का लगाने से साबुत मूंग के दाल का स्वाद दोगुना हो जाता है।
  2. इस तरह से साबुत मूंग का दाल घर पर आप कभी भी आसानी से बना सकते हैं।

(5 votes, average: 3.60 out of 5)


Plot No, 44, Hosur Rd
Konappana Agrahara
Electronic City
Bengaluru, Karnataka 560100
India

RecipesEasy Soya Chilli Manchurian सोया चिली मंचूरियन झटपट रेसिपी Soya Chunk recipe

Prep Time: 15 minutes

Cook Time: 25 minutes

Total Time40 minutes

Cooking is like love. It should be entered into with abandon or not at all /-

Servings :- 2

Cuisine :- Chinese

Ingredients

For Boiling Soya Nuggets…….

3-4 cups Water , पानी

½ tsp Sugar , चीनी

½ inch Ginger, chopped , अदरक

1 tsp Soy sauce , सोया सॉस

1 fresh Green chilli, slit in half , हरी मिर्च

1½ cups Soya Nuggets , सोया नगेट्स

For Frying Soya Nuggets…….

Boiled Soya Nuggets , उबले हुए सोया नगेट्स

2 tbsp Corn-starch , कॉर्न स्टार्च

Oil for frying , तलने के लिए तेल

For Sauces Mixture…..

3 tbsp Soy sauce , सोया सॉस

1 tsp Vinegar , सिरका

1 tsp Sugar , चीनी

1 tbsp Tomato ketchup , टाॅमेटो केचप

1 tbsp Red chilli sauce , रेड चिली सॉस

For Tempering…..

2 tbsp Oil , तेल

1-2 fresh Green chillies, chopped , हरी मिर्च

2 cloves Garlic, chopped , लहसुन

1 inch Ginger, chopped , अदरक

1 medium Onion, diced , प्याज

1 medium Capsicum, diced , शिमला मिर्च

Sauce mixture , सॉस का मिश्रण

Water , पानी

½ tsp Black pepper powder , काली मिर्च का पाउडर

4-5 tbsp Corn-starch slurry , कॉर्न स्टार्च का लीजाम

Fried Soya Nuggets , तले हुए सोया नगेट्स

Few Coriander leaves, roughly tron , धनिया पत्ता

1 whole Spring onion, cut in 1 inch pieces , प्याज पत्ता

For Garnish…..

Fresh Coriander leaves , धनिया पत्ता

Process

For Boiling Soya Nuggets…..

  • In a deep pan, add water once it starts boiling add sugar, ginger, soy sauce.
  • Add green chilli, soya nuggets and boil for 4-5 minutes.
  • Until the water is completely soaked.

For Frying Soya Nuggets…..

  • In a bowl, add cornstarch, soaked soya nuggets and mix it well.
  • Heat oil in a kadai, add soya nuggets and fry until it turns crisp from all the sides.
  • Remove in an absorbent paper and keep it aside.

For Sauce Mixture…..

In a bowl, add soy sauce, vinegar, sugar, tomato ketchup, red chilli sauce mix it well.

For Tempering…..

For Boiling Soya Nuggets

  • In a deep pan, add water once it starts boiling add sugar, ginger, soy sauce.
  • Add green chilli, soya nuggets and boil for 4-5 minutes.
  • Until the water is completely soaked.

For Frying Soya Nuggets

  • In a bowl, add cornstarch, soaked soya nuggets and mix it well.
  • Heat oil in a kadai, add soya nuggets and fry until it turns crisp from all the sides.
  • Remove in an absorbent paper and keep it aside.

For Sauce Mixture

  • In a bowl, add soy sauce, vinegar, sugar, tomato ketchup, red chilli sauce mix it well.

For Tempering

  • In a wok, add oil, once it’s hot add green chilli, garlic, ginger and saute it well.
  • Add onion, capsicum and saute on high flame till it slightly changes color.
  • Add sauce mixture, water, black pepper powder.
  • Add cornstarch slurry and mix until the gravy slightly thickens and turns glossy.
  • Add fried soya nuggets and toss everything well.
  • Add coriander leaves, spring onion and toss it well.
  • Garnish it with coriander leaves and serve hot

Cooking’s Love

If you are a chef, no matter how good a chef you are, it’s not good cooking for yourself; the joy is in cooking for others. It’s the same with music.”
Plot No, 44, Hosur Rd
Konappana Agrahara
Electronic City
Bengaluru, Karnataka 560100
India

https://www.instagram.com/invites/contact/?i=aehx3ucniyoo&utm_content=n3btee4

Contact us

MASALE BHAT RECIPE

Masale bhat is an easy, delicious, one-pot Indian vegetarian meal. Made with a melange of vegetables, like potatoes, cauliflower, peas, and Indian spices. This traditional Maharashtrian rice preparation is an amazing mix of spicy flavors and texture. Perfect to serve as one pot Vegetarian dinner! 

Masale Bhat is a popular Maharashtrian spiced rice dish which literally means spicy rice. Proper comfort food and a gluten-free vegetarian meal that can be prepared in less than 30 minutes.

You can enjoy this healthy vegetable masala pulao for lunch or dinner. Or you can even pack it in a lunch box for kids or the office lunch box. The best part is this vegetarian, one-pot rice recipe is super easy and quick to make

It is a quick rice recipe to make breakfast or lunch. The flavorful taste of Masale Bhat gets its unique taste from a special masala, known as goda masala. Follow the recipe to make this spicy and flavourful, Nutritious one-pot Indian meal in minutes.

This is one of the very popular Maharashtrian meals mostly served in Maharashtrian weddings and festivals. Traditionally masale bhat is cooked using brinjal, ivy gourds (tendli or tondli), peas

But The best part about this spicy rice dish is, it is highly customizable. So you can add your favorite vegetables and it will still taste delicious and amazing each time. 

To make Masale Bhaat I have used cauliflower, carrots, and peas. You can make it with your favorite vegetables. Just make sure not to use extra watery ones like cabbage or cauliflower as they tend to become soggy.

|| BEST RICE FOR MASALE BHAAT ||

Usually, short-grain rice like ambe mohar or kali jeera is used to make masale bhat.  But, sometimes I make it with whichever variety is available. This time due to lockdown I used my favorite long grain basmati. But feel free to use your favorite variety of rice. Just do not use over starchy ones though.

|| HOW TO MAKE MASALE BHAAT ||

!! MASALE BHAT INGREDIENTS !!

You need very few ingredients for masala bhat. All of these ingredients for making this spiced rice recipe are easily available. 

!! Grain !!

Basmati rice

Vegetables 

Carrot, Peas, and Cauliflower

Fat – 

Peanut oil or vegetable oil

Whole spices:

 Bay leaf, Cinnamon, Cloves, Black Peppercorns

Spices and seasonings

asafoetida/hing Turmeric Powder, Red chili powder, Garam Masala, and salt to taste.

Ingredients

2 tablespoon Peanut Oil
2 Bayleaf
1 inch Cinnamon
3-4 Cloves
½ teaspoon Peppercorn
⅕ teaspoon Asafoetida
1.5 teaspoon Ginger
3 Green Chili
¼ cup Coriander
¾ cup Onion
½ teaspoon Turmeric Powder
1 teaspoon Red Chili Powder
½ teaspoon Garam Masala
1 tablespoon Goda Masala
Salt to taste
¼ cup Peas
¼ cup Cauliflower
1 Medium Tomato
1 Medium Carrot
1 cup Rice
2 cup Water

MASALE BHAT RECIPE – STEP BY STEP

A :- Heat oil in a pan and add bay leaf, cinnamon, cloves, peppercorn, asafoetida, ginger, green chili, and coriander. (pic 1,2,3)

B :- Stir for a minute and add onions.

C :- Saute the onions till they are translucent or light brown. Then add turmeric powder, red chili powder, goda masala, garam masala, and sprinkle salt to taste. Roast the spices till they are aromatic. (Photo 3,4,5)

D :- Add tomato, peas, cauliflower, and carrots. (Photo 6) 

E :- Mix it so that the spices are well coated with the vegetables. Cook for a minute and add rice in it. (Photo 1,2)

F :- Mix the rice with the vegetables. Pour water and cover the pan with a lid. Cook for 10-1 minutes. (Photo 3,4,5)

Take off the lid and check if the rice is cooked. When done, add a generous squeeze of fresh lime and a good measure of freshly grated coconut and serve hot.

RECIPE NOTES AND TIPS

Traditionally, this recipe is made in Indrayani rice, Maharashtrian popular grain. It is very sticky. If you wish you can make it with Indrayani rice too. 

  • If the rice is uncooked then pour some hot water and continue cooking it.

To bring out the flavors in Masale Bhat, roast the spices in oil first. Try not to use water while roasting the spices. This will bring out the delicious flavor of Masale Bhat. 

If you do not have goda masala, you can substitute that with pav bhaji masala. The taste is not the same but it still tastes nice and delicious.

You can add garlic if you like that

You can skip onion and garlic both to make No Onion No garlic Version of masale bhaat. 

HOW TO SERVE MASALE BHAAT

This spicy rice dish is popularly served with varan and matha. Varan is again a spicy Maharatrian dish cooked with tuvar dal and moong dal. And, matha is spiced buttermilk or chaas. 

You can serve it with curd or pickle too. But, if you have Chaas that’s great. As it balances, the spice of Masale Bhat is great for summers. 

CV Plant, Plot No.25A, 3, adjacent to Tata Motors, Block F-2,
MIDC, Pimpri-Chinchwad
Pune
Pune, Maharashtra 431401
India

!! GUD WALI PINNI !!

In winter gud (jaggery) , dry fruits , flaxseeds are very good for health . These pinnis are made with all

Ingredients

500gram wheat flour
500gram jaggery
600gram clarrified butter (shudh deshi ghee)
1cup Almond
1cup cashwnuts
1/4cup pistachio
2spoon flaxseed
2apoon poppy seeds
1cup full makhana
50gram goond (Gum)
2spoon melon seeds
200gram rwa
2spoon powder sugar or (bura ,deshi khand )

Instructions

1 :- Take a heavy bottam wok heat it . Add Almond , cashwnuts,flaxseeds and roast for 2to3mibtues.

2 :- Remove from pan and crushed them in a grinder and place it a large plate

3 :- Now in same wok add 2spoon ghee melt it add goond (gum ) and cook for 2mintues . Remove from pan and grind it and put into dry fruits mixture .

4 :- In same wok add full makhana and roast for 1mintue

5 :- Grind the makhana and put into dry fruits mixture.

6 :- Now put 400gram ghee into wok melt it . Add wheat flour and start roasting at low flame keep stiring . Otherwise it start burn

7 :- Roast till it becomes brown in colour or a gud aroma comes out .

8 :- Put wheat flour mixture into same dry fruits mixture.

9 :- Now add some more ghee into the wok and roast rwa till golden in colour.

10 :- Put roasted rwa into same dry fruits mixture

11 :- Now roast poopy seeds for 1mintues. And put into plate

12 :- Now add 2 spoon ghee into wok melt it add gud and start melting. Add two spoon powder sugar or bura to adjust the sweetness.

13 :- Put melted ghee into all mixture and mix with a laddle.

14 :- Mix properly.

15 :- Now start make pinni with your hands . Small shape or big as per your choice .

16 :- And serve with tea or milk

Enjoy gud wali pinni.

Tried Our Recipe – AWESOME!!!

Now Quickly SNAP A PICTURE & TAG :

#beyond__eating +  @beyond__eating https://instagram.com/beyond__eating?utm_medium=copy_link  on Instagram –>

CV Plant, Plot No.25A, 3, adjacent to Tata Motors, Block F-2,
MIDC, Pimpri-Chinchwad
Pune, Maharashtra 431401
India

https://instagram.com/beyond__eating?utm_medium=copy_link

Connect with Me Here: 

!! खाने में फ्लेवर बढ़ाने के लिए पकाते समय करें इन 5 हैक्स का इस्तेमाल !!

अगर आपको खाने का फ्लेवर बढ़ाना है तो आप उसके लिए कुछ हैक्स का इस्तेमाल कर सकती हैं। जानिए ऐसे ही 5 हैक्स के बारे में। 


Beyond Eating

Editorial

31 Oct 2021, 09:47 IST

घर का खाना बनाते समय हम अक्सर एक बात को भूल जाते हैं कि हम अलग-अलग ट्रिक्स से रोजाना के खाने को भी ज्यादा फ्लेवरफुल बना सकते हैं। एक तरह से देखा जाए तो फ्लेवर खाने के इंग्रीडिएंट्स और उनके इस्तेमाल करने के तरीके से आता है और ऐसे में अगर आपको कुछ फूड हैक्स पता हों तो खाने का फ्लेवर बढ़ ही जाएगा। रोज़ाना में इस्तेमाल होने वाले जीरा, राई, करी पत्ता, हींग आदि से ही आप खाने को और भी ज्यादा स्वादिष्ट बना सकते हैं।

1 :- करी पत्ते और मछली का कॉम्बिनेशन-

अगर आपके घर में मछली बनती है तो उसे फ्राई करने से पहले आप थोड़े से करी पत्ते को तेल में फ्राई करें और फिर उसे हटा लें। ऐसा इसलिए ताकि आपकी मछली में करी पत्ते का फ्लेवर आ जाए और साथ ही साथ वो पैन में नीचे चिपकने से बचे।

ये तरीका बहुत ही आसान भी है और मछली में एक अच्छा फ्लेवर देने के लिए कारगर भी है।

2 :- खाने में बारबेक्यू फ्लेवर के लिए करें ये काम-

अगर आपको खाने में बारबेक्यू फ्लेवर लाना है और कहीं से भी तंदूर का इस्तेमाल नहीं कर पा रहे हैं तो आप अपने खाने में नॉर्मल नमक की जगह स्मोक्ड साल्ट या पेपर (काली मिर्च पाउडर) डालें।

  • नमक को थोड़ा सा ड्राई रोस्ट करने से भी काम हो जाएगा।
  • नहीं तो आप बाज़ार से स्मोक्ड साल्ट खरीद सकते हैं।
  • इससे आपके खाने में बारबेक्यू फ्लेवर आ जाएगा और आपके कबाब, टिक्का आदि बहुत ही अच्छे से तैयार हो जाएंगे।

3 :- दाल को बनाएं और फ्लेवरफुल-

रोज़ाना की दाल में और फ्लेवर डालने के लिए आप कई चीज़ों का इस्तेमाल कर सकते हैं और काफी नई-नई ट्रिक्स आजमा सकते हैं, जैसे-

  • पकाने या भिगोने से पहले दाल को थोड़ा सा रोस्ट कर लें। इससे दाल का फ्लेवर बहुत ही अच्छा आएगा।
  • दाल को उबालते समय ही 1 कटी हरी मिर्च, 2-3 कली लहसुन और थोड़ी सी हींग डाल दें। तड़के की जगह फ्लेवर के लिए ये ज्यादा अच्छा ऑप्शन होगा।
  • दाल में हरा धनिया डालकर उसे कुकर में चढ़ाएं। धनिया का फ्लेवर काफी अच्छा आएगा।

4 :- पानी में मिलाकर इस्तेमाल करें हींग

जब भी आप करी बेस्ड कोई चीज़ बना रहे हों जैसे रसम, सांबर या कोई भी ऐसी डिश जिसमें हींग का इस्तेमाल होता है तो हींग को गुनगुने पानी में मिलाकर फिर इसे 2-3 मिनट के लिए अलग रख दें। अब इसे अपनी डिश में डालें।

ध्यान रहे कि हींग बहुत ज्यादा नहीं होनी चाहिए वर्ना काफी समस्या हो जाती है। चुटकी भर हींग इस तरह से इस्तेमाल करने पर आपके खाने का फ्लेवर ज्यादा बढ़ा देगी।

5 :- कुकिंग ऑयल की स्मेल निकालने का तरीका-

कुकिंग ऑयल बहुत दिनों तक एक ही कंटेनर में रखा रहे तो उसमें से बासी स्मेल आने लगती है और अगर ये प्लास्टिक में है तब तो ऐसा होता ही है। अगर आप एक बार इस्तेमाल करने के बाद दोबारा कुकिंग ऑयल इस्तेमाल करना चाहते हैं तो आप ये तरीका अपना सकते हैं।

थोड़ा सा इमली का पल्प एक गोलाकार शेप में बनाएं और फिर ऑयल को गर्म कर इसे उसमें फ्राई करें।

30 सेकंड बाद इसे निकाल लें।

आपके ऑयल में फ्लेवर भी आ जाएगा और ये बासी भी नहीं लगेगा।
ये सारे हैक्स आपके खाने को और भी बेहतर बना सकते हैं। एक बार इन्हें ट्राई करें और अलग फ्लेवर पाएं।
CV Plant, Plot No.25A, 3, adjacent to Tata Motors, Block F-2,
MIDC, Pimpri-Chinchwad
Pune, Maharashtra 431401
India

Connect with Me Here: –

!! VEGETABLE BIRYANI !!

ABOUT VEGETABLE BIRYANI RECIPE

This delicious biryani is loaded with veggies mixed with curd and spices/-

Serving: 4

Ingredients

Basmati rice- 1 cup

French beans- 1/2 cup

Carrots- 1/2 cup

Green peas- 1/2 cup

Cauliflower- 1/2 cup

Potatoes- 1/2 cup

Onions- 6

Curd- 1 cup

Ginger garlic and green chilli paste- 1 tbsp

Oil- 2 tbsp

Kesar- 1 pinch

soaked in 1 tbsp

milkGhee- 2 tbsp

Cumin Seeds- 1 tsp

Cloves- 5

Cinnamon- 1 inch

Cardamom- 5

Bay leaf- 2

Instructions

1 :- Cut all vegetables in medium size pieces and take 2 whistles in cooker. Now they are semi cooked.

2 :- Prepare fried brown onions or brista from 6 onions.

3 :- Soak kesar in milk.

4 :- Soak rice for half an hour. Boil in water and salt till half cooked and immediately drain in a colander.

5 :- Now take a pressure cooker. Add oil, as oil heats up add cumin seeds, cloves, cinnamon, cardamom, bay leaf and saute.

6 :- Now add the ginger garlic paste and saute till raw smell goes away. Add turmeric, chilli powder, cumin ,coriander powder, garam masala or biryani masala and saute.

7 :- Add salt and semi cooked vegetables along with the stock in which they were boiled. Mix properly.

8 :- Add some fried onions which we have prepared.

9 :- Now switch off gas and add curd and mix properly till all vegetables are covered with spices.

10 :- Take out half of this vegetable mix in a bowl.

11 :- Now we have a bottom layer of vegetables in cooker, add a layer of rice.Pour some ghee evenly and some kesar milk.

12 :- Finally top it with remaining rice. Pour some ghee and rest of kesar milk on this layer evenly.

13 :- Again add the vegetables which we had removed in a bowl. Spread evenly. You can add some mint leaves in this layer.

14 :- Now we have prepared the cooker with biryani. Half an hour before serving you can switch on the gas at low flame and let the biryani cook for about 15 to 20 minutes.

15 :- Sprinkle some fried onions and cover with cooker lid.

16 :- In case your dinner is delayed you can keep cooker on an iron pan and heat it indirectly to warm it again. Serve hot with any raita of your choice:-)

Tried Our Recipe – AWESOME!!!

Now Quickly SNAP A PICTURE & TAG :- beyond__eating +  @beyond__eating https://instagram.com/beyond__eating?utm_medium=copy_link  on Instagram –>

Connect with Me Here: –

CV Plant, Plot No.25A, 3, adjacent to Tata Motors, Block F-2,
MIDC, Pimpri-Chinchwad
Pune, Maharashtra 431401
India

Arnav Gupta

Biryani is never vegetarian…. This is a pulao

Maanika Hoon

Absolutely mouth watering good dish!

!! CHICKEN VINDALOO !!

ABOUT CHICKEN VINDALOO RECIPE :-

A tangy and fiery hot recipe from Goa. Vindaloo is originally a Portuguese recipe that has a chilli ,garlic and wine based recipe but we Indians use vinegar instead of wine. I prepared this dish and it turned out awesome.

Ingredients

Chicken – 1 kg

Dry kashmiri red chillies – 8Dry

red chillies- 4-5

Cumin seeds-1/2 tbsp

Garlic cloves – 10-12

Ginger roughly chopped – 1 tbsp

Green cardamom -2

Cinnamon – 1/2 inch

stickVinegar – 5 tbsp

Salt as required

Onion -2 large sized,

thinly sliced Turmeric – 1 tsp

Coriander powder- 2 tsp

Garam masala -2 tsp

Instructions

1 :- Soak the kashmiri dry chillies and dry red chillies in warm water for 2-3 hrs, if you don’t want it too spicy, you can deseed both the red chilies or reduce the amount of red chilies/-

2 :- Now grind these soaked red chilies, garlic cloves, ginger, cardamom, cinnamon, cumin seeds and 3-4 tbsp vinegar into a fine paste. Marinate the chicken with this paste for 45 mins -1 hour/-

3 :- Heat a kadai with 3-4 tbsp oil, add the thinly slice onions and fry till it turns brown in colour. Then add the marinated chicken and fry the chicken on a high flame for 4-5 mins. Now add in turmeric,coriander powder, salt and give it a good stir/-

4 :- Then reduce the gas on a low flame, cover and cook for 15-20 mins while occasionally stirring the chicken in between/-

5 :- After 20 mins, once the chicken becomes tender and the masala separates from the oil, means it’s almost done/-

6 :- Now you can add water as per your desired consistency and keep cooking it further for 5-6 mins. If you want it to be a little more tangy, you can add a little more vinegar at this time. Next, add the garam masala and check the seasoning/-

7 :- Chicken vinlaoo Is ready to be served! Serve it with steam rice/ bread / roti or whatever you like to eat.

Tried Our Recipe – AWESOME!!!

Now Quickly SNAP A PICTURE & TAG :

Connect with Me Here: 

#beyond__eating +  @beyond__eating https://instagram.com/beyond__eating?utm_medium=copy_link  on Instagram –>

@twenty4eleven19

https://instagram.com/beyond__eating?utm_medium=copy_link

https://www.facebook.com/profile.php?id=100072401643963

CV Plant, Plot No.25A, 3, adjacent to Tata Motors, Block F-2,
MIDC, Pimpri-Chinchwad
MIDC
Pune, Maharashtra 431401
India

How would you rate this recipe? Please add a star rating before submitting your review.Submit Review

Tulona Chatterjee

Really it’s awesome…and my husband love this chicken the most.

Deepsikha Roy Chakraborty

Really yumm

Sukhmani Bedi

Awesome recipe saving it

Restaurant Style Pressure Cooker Egg Biryani – Mughlai Egg Biryani

Restaurant-style egg biryani made in pressure cooker using basic everyday ingredients like rice, eggs, yogurt, spices, and masala. Step by Step method for a perfect Mughlai Egg Biryani with serving suggestions/-

This weekend I made my family’s favorite ‘Restaurant Style Egg Biryani’ which everyone also calls ‘Pressure Cooker Egg Biryani or Mughlai Egg Biryani too.

These days it’s so tough to decide which day of the week it is and hence we miscalculated and were left with only ‘eggs’ in our kitchen pantry.

And I was in no mood to have another and paratha or giant scramble or something of those sorts.

Hence, a spicy, fragrant and fingerpicking egg biryani was a perfect solution !!!

Now as many of you might have noticed, all my biryani recipes are inspired more by Mughlai Cuisine, hence my Egg Biryani is no different and has an abundance of Mughlai Flavors like cardamom, rose water, saffron, etc..//

Restaurant Style Pressure Cooker Egg Biryani Ingredients:

For Cooking the Rice:-

  • 2 Cups Basmati Rice
  • 5 Cups Water – to make the rice
  • 1/2 Tsp Salt
  • 4 Cloves
  • 2 Dry Bay Leaf (Tej Patta)

Other Biryani Ingredients:-

  • 4 Medium Red Onion – thinly sliced
  • 4 Tbsp Oil – to fry onion
  • 2 Tbsp Flour – for crisping biryani
  • 1 Tbsp Ginger Paste
  • 1 Tbsp Garlic Paste
  • 2 Tbsp Chopped Almonds – optional
  • 1 Cup Plain Yogurt
  • 1/2 Cup Water
  • 10 Fresh Mint Leaves
  • 4 Tbsp Olive Oil – to make masala
  • 4 Tbsp Ghee
  • 1 Tsp Rose Water – optional
  • Few Strands of Saffron – optional
  • 3 Tbsp Milk – to soak the saffron – optional

Whole Spices:-

  • 1 Cinnamon Stick – broken into 2-3 pieces
  • 1 Bay Leaf
  • 3 Black Cardamom
  • 6 Green Cardamom
  • 4 Cloves
  • Pinch of Nutmeg

Powdered Spices:-

  • 1/4 Tsp Black Pepper Powder
  • 1 Tbsp Coriander Powder
  • 1 Tbsp Cumin Powder
  • 2 Tbsp Garam Masala
  • 1/2 Tsp Turmeric – optional
  • 1 Tsp Kashmiri Red Chili Powder – optional
  • Salt – as per taste

Restaurant Style Pressure Cooker Egg Biryani Process:-

Cooking the Rice:-

  1. Heat 5 cups water In a large pot.
  2. Once the water starts to boil, add rice, salt, bay leaf, and cloves.
  3. Stir everything snd let this simmer on low-medium heat for 17 minutes.
  4. Check rice after 17 minutes, it should have cooked 90% hence turn off the heat.
  5. Strain the rice of water and keep aside.
Basmati Rice for Biryani

Cooking the Eggs:-

1 :- Place 6 eggs In a large bowl and sprinkle red chili powder, turmeric, and salt.

2 :- Coat the eggs with the above spices and keep aside.

3 :- Heat 1 tsp oil in a large non-stick pressure cooker (I’m using 7-liter pressure cooker).

4 :- Add the eggs and saute for 2 minutes on low flames.

5 :- Once the eggs start to blister and brown on each side, turn off the heat.

6 :- Remove the eggs and keep aside


Frying the Onions:-

  1. Place 6 eggs In a large bowl and sprinkle red chili powder, turmeric, and salt.
  2. Coat the eggs with the above spices and keep aside.
  3. In the same pressure cooker, add 3 tbsp oil and 4 tbsp of chopped onion mixture.
  4. Saute on low-medium flame till onion turns brownish pink and crisp up.
  5. Remove from the cooker and keep on paper towel/plate.
  6. Similarly, fry all the onions and keep aside.

Making the Egg Biryani Recipe:-

  1. In the same pressure cooker, heat 3 tbsp oil + 2 tbsp ghee.
  2. Add all the crushed whole spices and saute for a minute.
  3. Add ginger + garlic paste, all powdered spices and saute on medium heat till they turn golden in color (about 2 minutes).
  4. Now add fried onions and saute.
  5. Add yogurt, water, and cover cook for another 2 minutes.
  6. Now add fried eggs and let everything simmer for 2 minutes. Then turn off the heat.
  7. Remove eggs separately in a bowl and remove the cooked masala in a separate bowl. (Leave the pressure cooker as is for further use).

Layer the Egg Biryani in Pressure Cooker:-

  • 👉In the same pressure cooker, place 2 ladles of cooked rice, sprinkle 2tbsp of cooked masala, add 2 tbsp of fried onions, chopped cilantro+mint, 1 or 2 fried eggs and sprinkle color if using. (picture below)
  • 👉Layer 2 ladles of rice and follow the process above.
  • 👉Repeat the process till you reach the top of the dish.
  • 👉Now add remaining fried eggs, fried onion, masala and cilantro+mint, 2 tbsp ghee (all remaining ingredients).
  • 👉OPTIONAL: add rose water and saffron soaked in milk.
  • 👉Cover the pressure cooker and let cook for 2 minutes on medium flames.
  • 👉Turn off the heat and wait for 5 minutes.
  • 👉Fluff the biryani using a big fork (scoop and mix the rice and egg layers).
  • 👉The biryani is ready to serve now.

Mughlai Egg Biryani Serving Suggestion:-

  • 1 :- Serve Fresh with choice of pickle/curry/pappadam or yogurt dip.
  • 2 :- You can even serve this with a simple cucumber-tomato salad

————————

Tried Our Recipe – AWESOME!!!

Now Quickly SNAP A PICTURE & TAG :

#beyond__eating +  @beyond__eating https://instagram.com/beyond__eating?utm_medium=copy_link on Instagram –>

Connect with Me Here: 

twenty4eleven19@gmailcom
CV Plant, Plot No.25A, 3, adjacent to Tata Motors, Block F-2,
MIDC, Pimpri-Chinchwad
Pune, Maharashtra 411018
Indian

4.8 Stars (14 Reviews)

Shraddha Salvi Sep 26, 2021 (9:06 am) 

Hii Ayush,
Shraddha here again.. I’ve bookmarked this recipe and was thinking if i can replace eggs with chicken for mughlai chicken biryani. If so, what should be the quantity of chicken used for 3 cups of uncooked rice.

Hello Shraddha, yes you can replace the eggs with chicken. You can use 4-6 chicken drumsticks or 3 chicken breasts or 750 gms whole chicken for 3 cups rice. Thanks, Molly

Shraddha Salvi Sep 26, 2021 (9:20 am) 

This recipe is awesome! Can’t thank you enough! M having it now while typing this message ..and i love it!

Anagha Suri Sep 26, 2021 (2:29 pm) 

Reply

Hello Molly, we made the egg biryani for Sunday brunch and everyone loved it, especially my 6 year old son. He made us save some for tomorrow lunch. Thank you for such a delicious recipe – Anagha

Reply

Natalie Sep 26, 2021 (11:12 am) 

What a lovely recipe. What delicious flavors. I must give this a try soon. Can’t wait to serve this to my family too.

Reply

Leslie Sep 26, 2021 (10 :00 Am) 

I can’t get over how satisfying this recipe looks! You have some great flavors combined with this recipe!

Reply

Pavani Sep 26 , 2021 (12:28 am) 

I LOVE biryani and your Mughlai egg biryani is literally calling my name. It looks soo inviting and must have tasted heavenly with all the spices. Yumm!!

Simmy Sep 26 2021 (2:08 pm) 

Reply

Well for all those who are reading this, i must tell you all that writing a comment is a big task for me. After trying the Egg Biryani recipe yesterday i couldn’t hold myself. Beyond eating thanks for letting me cook something so special. You are awesome. Keep cooking and keep sharing. Yummmmm

Modak Recipe

Prep Time :- 5 mins

Cook Time :- 20 mins

Course :- sweet

Cuisine :- maharashtra

Servings :- 12 modak

Calories :- 221 kcal

|| INGREDIENTS ||

for stuffing:

for dough:

INSTRUCTIONS

stuffing preparation: –

1 :- Chop the jaggery and keep aside. Also grate the coconut and set aside. You will need 1 cup jaggery and 1 cup fresh grated coconut.

If you do not have access to fresh coconut, then use frozen coconut or desiccated coconut. For desiccated coconut use fine grates or fine shreds.

2 :- Heat ghee in a pan. Add ½ teaspoon poppy seeds. Keep flame to a low. Fry for some seconds till the poppy seeds start crackling.

3 :- Then add 1 cup grated fresh coconut (100 grams) and 1 cup chopped jaggery (200 grams).

4 :- Mix well and cook this coconut-jaggery mixture on a low flame.

5 :- The jaggery will melt first. Cook on a low flame and stir often.

6 :- Stirring often cook this mixture till the moisture from the jaggery begins to dry – about 7 to 9 minutes. Switch off the flame.

Don’t overcook as the jaggery then hardens. Keep this coconut-jaggery filling aside and let it cool completely. On cooling, the mixture will thicken more.

7 :- The following is an optional step. You can add 1 tablespoon rice flour to this mixture and mix well.

The rice flour helps to absorb moisture if any from the stuffing. Set the stuffing aside.

|| Make rice dough ||

1 :- In a pan add 1.5 cups water, ¼ teaspoon oil or ghee and ¼ teaspoon salt. Keep it on the stovetop.

2 :- Let this mixture come to a boil.

3 :- Add 1 cup rice flour (150 grams). You can use homemade rice flour or packaged flour. Make sure the rice flour is fresh and within its shelf period.

4 :- Quickly stir and mix the rice flour with the water.

5 :- Stir till all the rice flour is mixed with the water. Switch off the flame. Remove the pan from the burner and keep on the workplace. Cover the pan with a lid for 4 to 5 minutes.

6 :- Now take all the dough in a plate or thali or in a bowl. Gather the dough together and begin to knead it.

The dough will be hot when you begin to knead. So apply some water on your palms and knead the dough. Knead the dough very well.

If you feel the dough looks dense or hard or dry, then just add a few teaspoons of warm water and continue to knead.

7 :- Knead to a smooth and soft dough without any lumps.

8 :- Make small balls from the dough. Roll the balls till smooth in your palms. You can also apply some water on your palms, while rolling the balls. Keep the balls covered with a kitchen towel. The balls should not have cracks. They should be smooth in appearance.

|| Shape modak without mould ||

1 :- Take a ball and flatten it with your fingers or on your palms, to a round disc or a shallow bowl shape to a medium thickness.

You can apply ghee or oil in your palms, while flattening. You can keep the edges slightly thin and the center can be thick.

2 :- Place a few teaspoons of the prepared stuffing in the center.


3 :- Press the edges as shown in the pic below. You can also press the edges first and then place the stuffing.

4 :- Bring together all the edges and join them. Remove the extra portion of the dough from the top, if any. Shape and taper the top of the modak with your fingers.

You can also use ready modak moulds. They are usually available in shops and market some days before the Ganesh Chaturthi festival.

|| Make modak with mould ||

1 :- Grease the modak mould with a bit of ghee or oil. Then close or lock the mould. Put the dough ball inside the mould and press it so that a space is made in the center. The rice dough will form a layer touching the walls of the mould.

2 :- Place the sweet stuffing.

3 :- Cover the bottom with a small piece of dough. Press and smoothen it sealing the modak.Cover the bottom with a small piece of dough. Press and smoothen it sealing the modak.

4 :- Open or unlock the modak mould. Remove the modak gently from the mould. Shape all modaks this way with mould. Keep the shaped modak covered with a napkin so that the rice dough does not dry out. 

5 :- Make all the modak this way. Brush or grease a pan with some oil or ghee. The pan can also be lined with banana leaves or turmeric leaves. Place the shaped modak in the greased pan with some space around them.

|| Steaming Modak ||

1 :- Take 2 to 2.5 cups water in a pot, pressure cooker or an Instant Pot steel insert. Place a trivet or a rack. Heat the water till starts to boil on a high flame. For instant pot, use the sauté option and let the water begin to boil.

2 :- I have stacked two pans for steaming 16 modak. But you can also steam the modak in separate batches. Just cover the shaped modak with a moist muslin or cotton napkin before you begin to steam.

3 :- Cover the pan and steam modak for 10 to 15 minutes on medium-low flame. On the Instant Pot, use the steam function on high for steaming and keep the steam vent in venting position so that the steam releases while steaming.

Use a stop watch to set the time to 10 or 12 minutes. Once the ukadiche modak are steamed, you can drizzle a few teaspoons of ghee on them.

Some modak may crack while shaping or steaming, but it is fine. You can forgive yourself if you are making modak for the first time.

4 :- The ukadiche modak are ready to be offered to Bhagwan Ganesha. Modak stay good for a couple of days in the refrigerator. While serving after refrigerating, steam them in a pan till warm or sprinkle some water on them and microwave till warm.

Expert Tips for Perfect Modak

  • Rice dough: While making modak recipe, the most trickiest part for many is to get the correct texture in the rice dough. If the dough is dry, you will find it difficult to shape and the resulting texture after steaming will be chewy and dense. The proportion of rice flour to water I use work perfectly for a smooth and soft dough. However do note that depending on the texture of rice flour, you may need to add a bit less or more water.
  • Stuffing: Overcooking the stuffing will result in the jaggery become hard and chewy. If this happens, then just sprinkle a few tablespoons of hot water in the mixture and stir well. The hot water will breakdown the hard consistency of the jaggery and make them soft. You can even sprinkle some water and cook the mixture on low heat until it softens.
  • Cracks in the dough: Less water will result in the dough being dry and having cracks. If you add more oil or ghee than this will result in the dough tearing when you shape it.
  • Flattening and Shaping: Do not flatten the dough too thin or too thick. A thin dough will tear while shaping and a thick dough will take more time to cook and does not taste pleasant.

Vegetarian
4.97 from 109 votes • 137 CommentsShares441Step by StepJump to Recipe