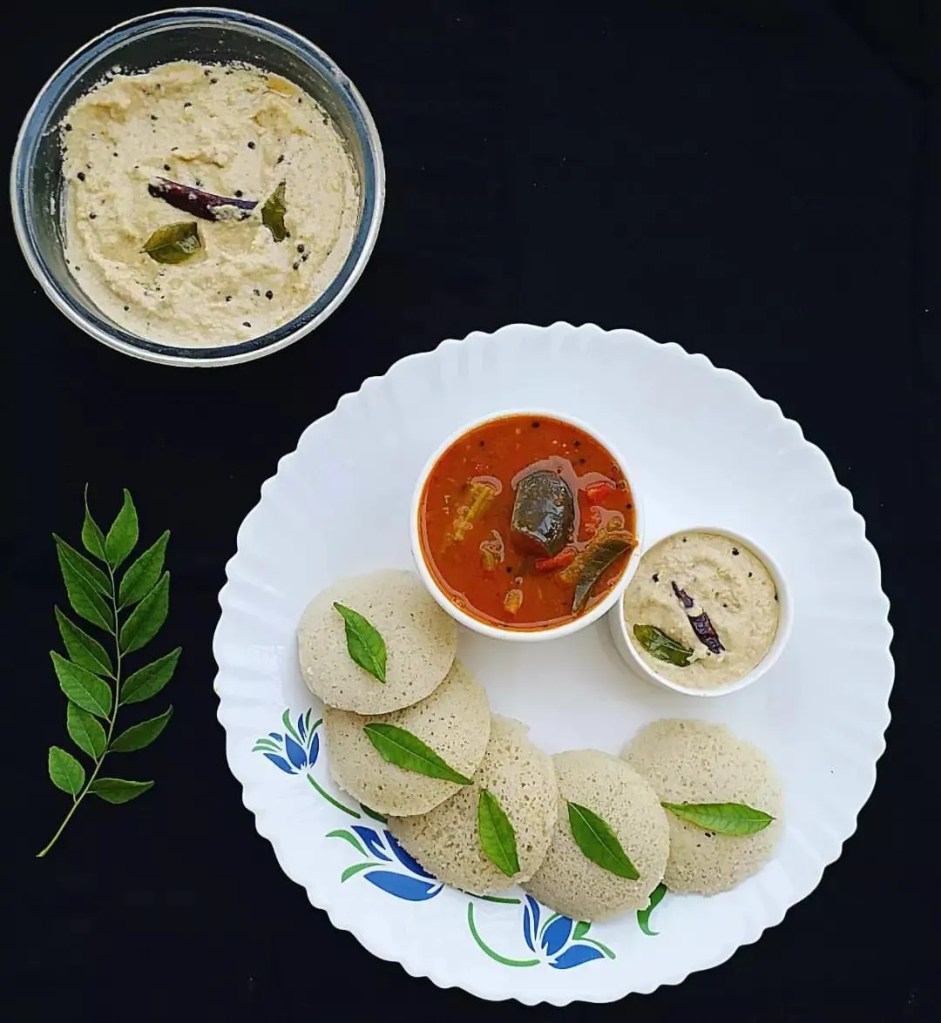
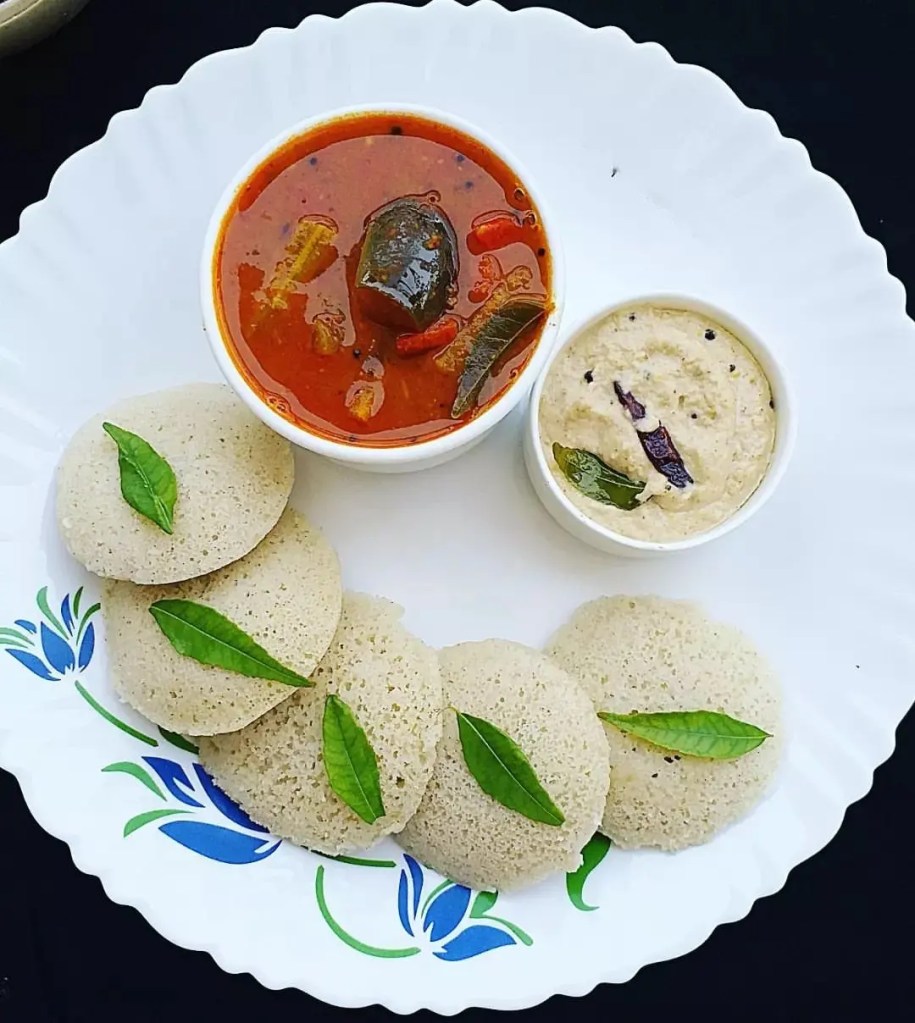
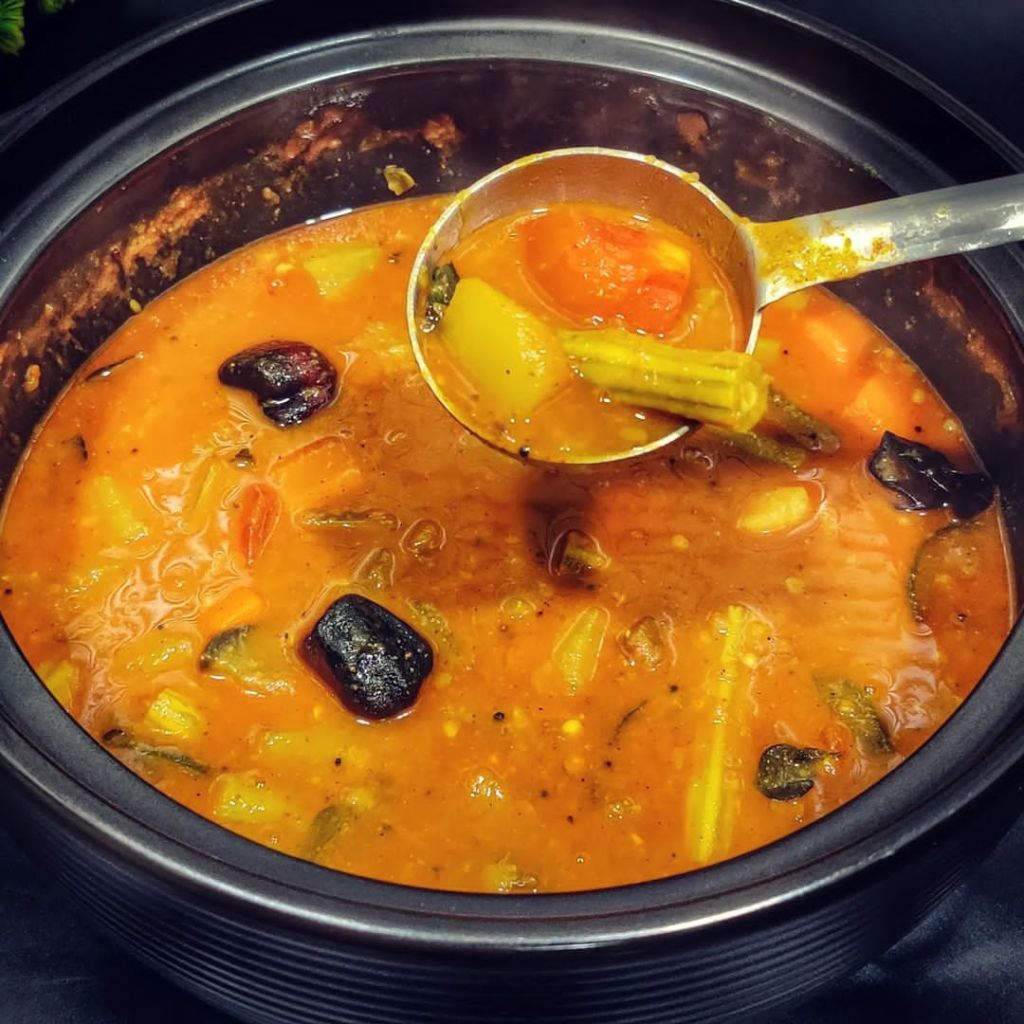
The best way to start the morning with your favourite kinda breakfast platter😋 Instant Jowar Idlis with no onion no garlic sambhar and groundnut chutney
{Jowar idlis} . .In a large bowl combine 1/2 cup jowar flour, 1/2 cup semolina, salt, 1/2 cup curd and water. .Mix it well and rest the batter for 20–25 minutes ( not more than that) .Add eno and one tsp of water on top of the eno to activate it. Mix it. .Grease your idli plates with oil. .Steam them on high flame for 10-11 minutes. . {Groundnut/ peanut chutney} . .dry roast 3/4 cup peanuts on medium flame. .roast till the peanuts start to separate the skin. .allow to cool down and remove the skin completely. .add oil in a pan and roast 1 tsp urad dal and 1 tsp chana dal, 1 green chilli and cumin seeds .transfer everything to the blender with salt and little water, also add in small piece tamarind or lemon juice . .now prepare the tempering by heating 2 tsp oil. .add in 1 tsp mustard seeds, 1 tsp urad dal, pinch of hing, 1 dried red chilli and few curry leaves. .allow the tempering to splutter. .pour the tempering over peanut chutney and serve along with idli or dosa. . {No onion No garlic sambhar} . .Boil toor dal along with salt and turmeric .Mix tamarind water in boiled dal .Add oil in a kadai .Splutter mustard seeds and fenugreek seeds .Add heeng, curry leaves and ginger .Add veggies of your choice (carrot, brinjal, pumpkin, bottle gourd, beans and drumstick) .Add chopped tomatoes and salt. Mix well .Add sambhar powder and red chilli powder. Mix well .Add little water. Cover n cook for 5 minutes or until veggies cooked properly .Add boiled dal and mix well .Cook for 2-3 minutes on high .Garnish with fresh coriander and serve
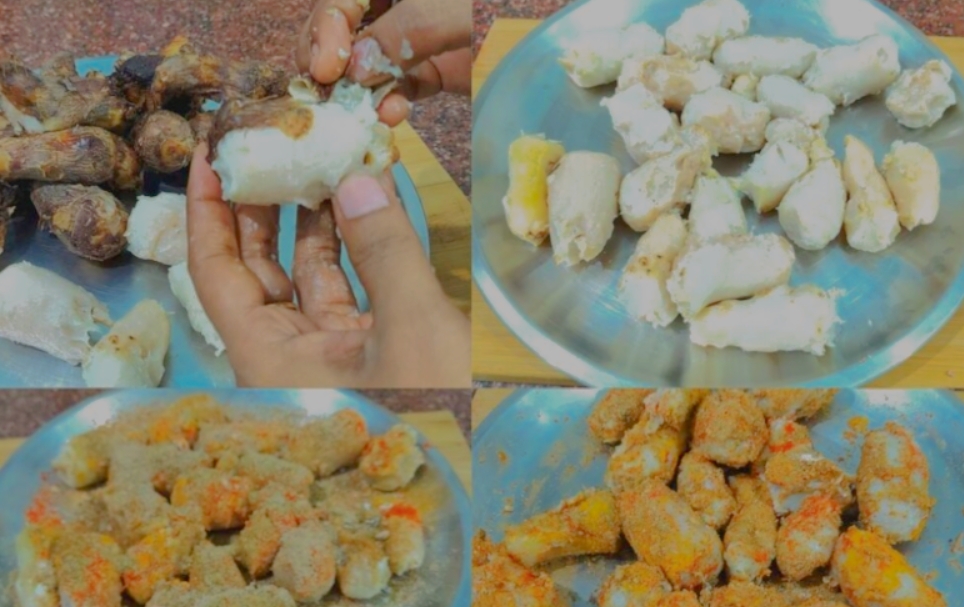
अरबी की सूखी सब्जी, वैसे तो अरबी को कई तरह से बनाया जाता हैं। लेकिन उबली अरबी को मसालों (Arbi Masala Sabji) के साथ मिलाकर फ्राई करके बनाया जाता है। ये खाने में बहुत ही स्वादिष्ट होती है। इसे बनाना बहुत ही आसान। इसे हम बच्चो को लंच बॉक्स में नास्ते में या सफ़र में ले जाने के लिये बनाकर तैयार कर सकते है।चलिए बनाते है अरबी की सूखी सब्जी ( Arbi Ki Sukhi Sabzi)।
अरबी -500 ग्राम सरसों का तेल – 2-3 बड़े चम्मच अजवायन – एक छोटी चम्मच हींग – एक चुटकी हल्दी पाउडर – 1/2 एक छोटी चम्मच लाल मिर्च पाउडर – एक छोटी चम्मच धनिया पाउडर – 2 छोटी चम्मच जीरा पाउडर – 2 छोटी चम्मच अमचूर पाउडर – आधा छोटी चम्मच गरम मसाला – 1/3 छोटी चम्मच नमक – स्वादानुसार
बनाने की विधि:- ( How to make Arbi Ki Sukhi Sabzi )
अरबी को अच्छे से धो ले और कुकर में डालकर उस मे थोड़ा सा पानी डाल दे। और कुकर का ढक्कन बंद करे. अरबी को गैस पर उबलने रख दीजिये। कुकर में एक सीटी आने पर गैस धीमी करके उसमे चार से पांच सिटी लगने तक पका ले। अब गैस बन्द कर करे, फिर कुकर का प्रेशर खत्म होने पर कुकर खोलिये और अरबी को कुकर से निकाल कर प्लेट में रख दीजिए और ठंडा होने दे।
इस रेसिपी को भी ट्राई करें, आप को अच्छा लगेगा (👇 नीचे लिखे रेसिपी के नाम पर टच करे)
अरबी ठंडी होने के बाद छील कर प्लेट रख लीजिए।और सारे मसाले एक छोटी कटोरी में निकाल कर मिक्स कर के रख लीजिये।
अब हमने जो कटोरी में मसाला तैयार किया है। उसे अरबी में सारे मसाले और नमक डालकर मिक्स करना है।
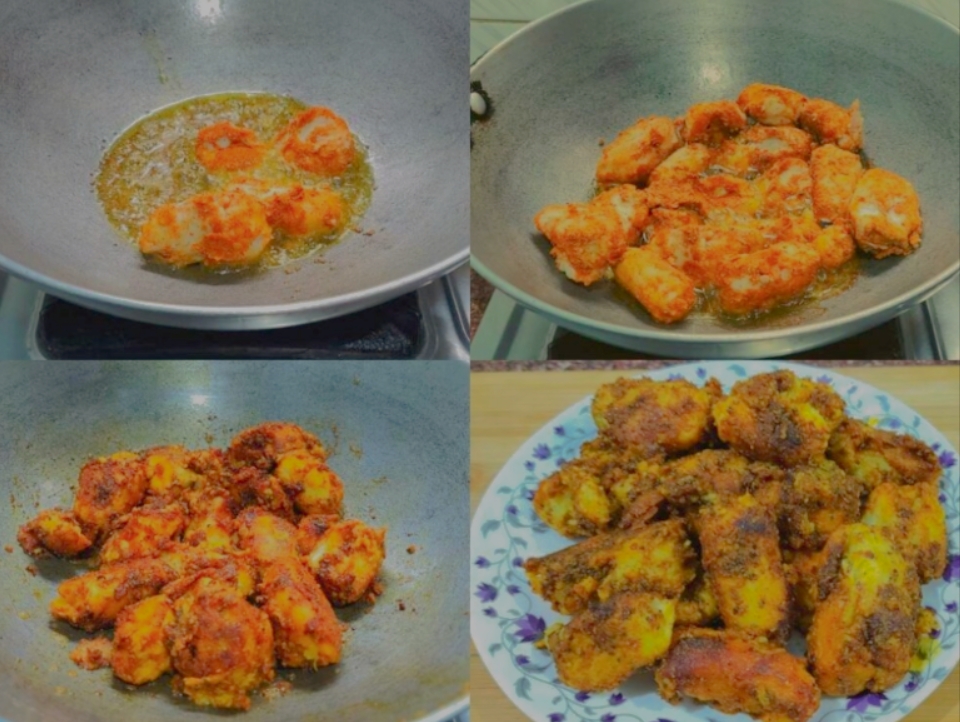
अब कड़ाई या पैन में तेल डाल कर गरम करे। गरम तेल में हींग और अजवायन डाल दीजिए और इसके तड़कने के बाद अब इसमें मसाले वाली अरबी डालकर फ्राई करना है। अरबी को ढक कर 4 -5 मिनिट के लिए धीमी आंच पर ब्राउन होने तक पकने दीजिए। 5 मिनिट बाद अरबी को चैक कीजिए। एक तरफ से सिक जाने के बाद अरबी को पलट कर दूसरी ओर से भी अच्छे से ब्राउन होने तक पकने दीजिए। अरबी को फिर से ढक कर 4 मिनिट के लिए धीमी आंच पर सिकने दीजिए. 4 मिनिट बाद अरबी को चैक कीजिए।
अरबी की सूखी सब्जी (Arbi Ki Sukhi Sabzi) बनकर तैयार है। अब अरबी को प्लेट में निकाल लीजिए. बहुत ही स्वादिष्ट अरबी बनी है। इसे आप गरमा गरम रोटी, पूरी या परांठे के साथ सर्व करें।
!!सुझाव!!
आप ज्यादा खट्टा पसंद करते है, तो आप अरबी में ऊपर से नीबू निचोड़ कर खा सकते है, यह बहुत ही टेस्टी लगते है।
मुझे विश्वास है की आपलोगों को ये रेसिपी बहुत पसंद आयी होगी। अगर आपको इस रेसिपी से जुड़ी कोई भी सवाल है तो आप हमसे पूछ सकते है। और हम कोशिश करेंगे की उसे जल्द से जल्द आपको बता दे। धन्यवाद!
परवल से कई प्रकार की सब्जी (Parwal Sabji) बनती है।आज हम बनायेंगे भरवां परवल रेसिपी (Bharwa Parwal Recipe) इसको स्टफ्ड परवल (Stuffed Parwal) के रूप में भी जाना जाता है। परवल को बीच से कट लगाकर उसमें मसाले भरकर बनाया जाता है। परवल को विभिन्न नामों जाना जाता है जैसे : बंगाली असमिया, संस्कृत, ओडिया में ‘पोटोल’ उर्दू,भोजपुरी, अवध भाषा में ‘परोरा’ हिंदी में परवल कन्नड़ में ‘थोंड़े काई’ और तमिल में ‘कोवाककई’ यह परवल का भरवां रेस्पी उत्तरी और पूर्वी भारत में बहुत प्रसिद्ध है।
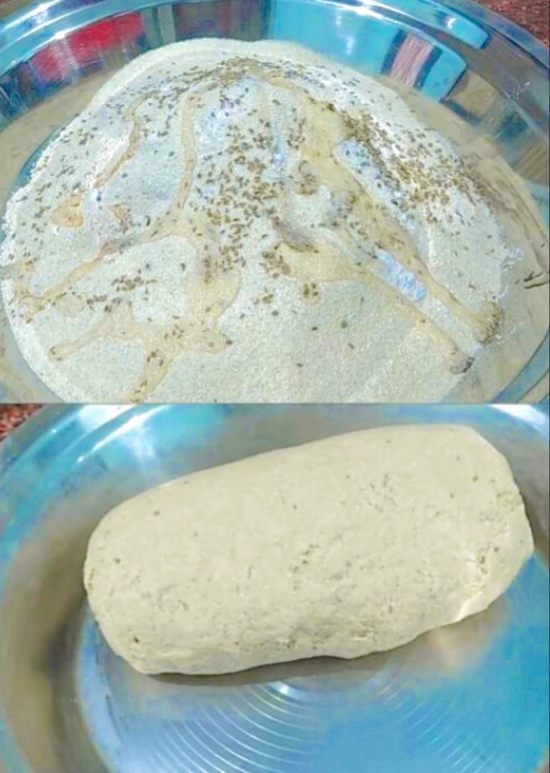
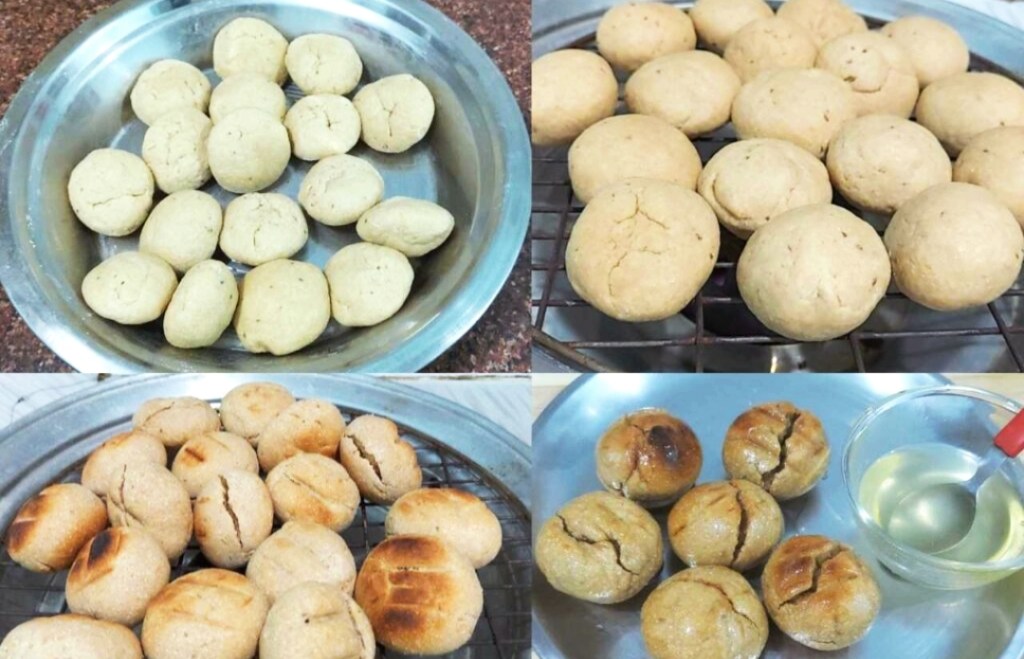
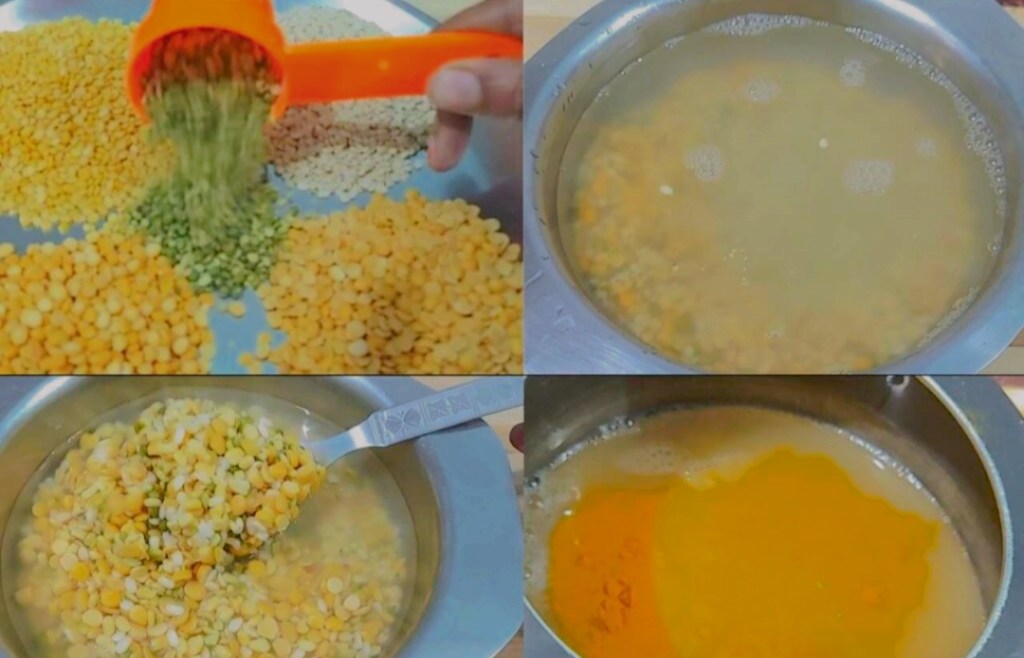
दाल बाटी चूरमा (Dal Bati Churma) राजस्थान और मध्य प्रदेश के कुछ हिस्सों में खूब पसन्द से बनाया और खाया जाता है.. पंचमेल मिक्स दाल के साथ इसका स्वाद बहुत ही अच्छा लगता है। आमतौर पर इसे कंडे (उपले ) की आग मे बनाया जाता है। इसे हम ओवन में भी बना सकते है. गैस वाले ओवन पर भी रखकर बाटी पकाई जाती है.
सभी दालों को साफ पानी से धोकर पानी में एक घंटे के लिए भिगो दे।
एक घंटे बाद दाल को कुकर में तीन कप पानी या अन्दाजानुसार, नमक और हल्दी पाउडर डाल कर पकने के लिये गैस पर रख दीजिये।
एक सीटी आने के बाद आंच धीमी करे.अब गैस धीमी करके 3 से 4 सीटी आने के बाद गैस बन्द कर दीजिये और कुकर के ठंडा होने तक, तड़का तैयार कर लेते है।
कुकर ठंडा होने पर खोल कर दाल को चमचे से मैश करे, अगर दाल ज्यादा गाढ़ी लगे तो थोडा गरम पानी मिला दे
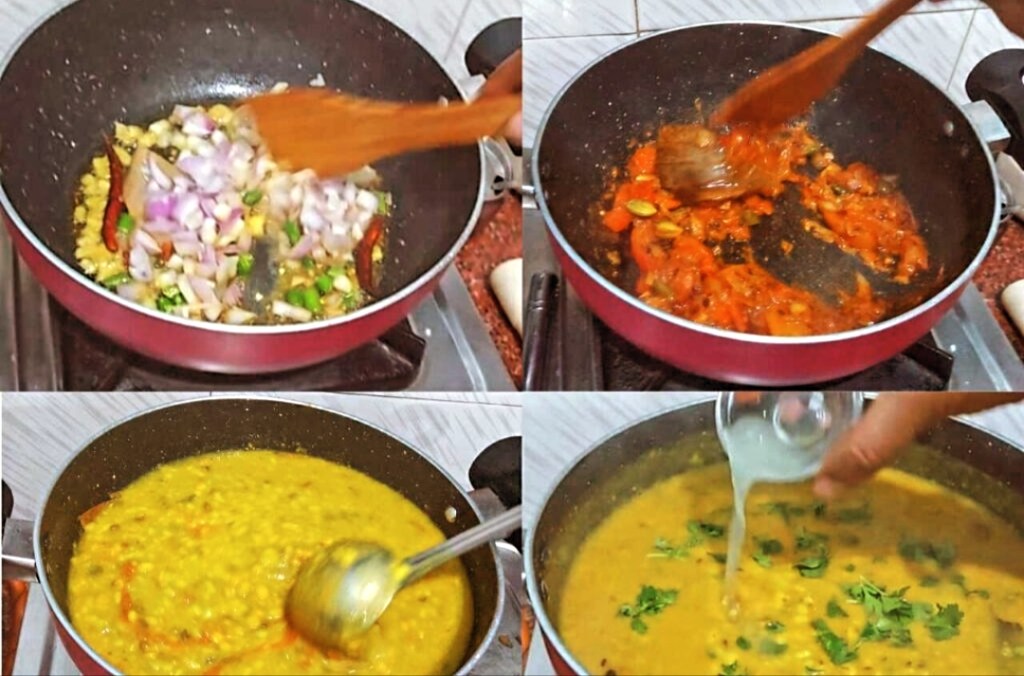
एक पैन या कड़ाही में तेल या घी गर्म करें उसमें जीरा, हींग, लाल मिर्च, तेज पत्ता, दालचीनी, छोटी इलायची, अदरक, हरी मिर्च,प्याज़, डाल कर हल्का ब्राउन होने तक भूनें फिर धनिया पाउडर,लाल मिर्च पाउडर, टमाटर डाल कर गलने तक पकाए,
फिर उसमें उबली दाल डालकर अच्छी तरह मिक्स करे और गरम मसाला पाउडर, हरा धनिया डाल कर एक उबाल आने तक पकाए. फिर गैस बंद करके उसमे नींबू का रस और हरा धनिया दाल मिलाएं
तैयार की हुई बाटी को हल्का ठंडा होने दे, फिर उसे तोड़ के मिक्सी में पीस लीजिये। बाटी में पिसी हुई चीनी, अपनी पसंद के मेवा और एक चम्मच घी मिला लीजिये।
चूरमा तैयार है. इसे दाल बाटी के साथ ही सर्व करे।
दाल बाटी चूरमा रेसिपी (Dal Bati Churma Recipe) बनकर तैयार है ।
!! धन्यवाद!!
मुझे विश्वास है की आपलोगों को ये रेसिपी बहुत पसंद आयी होगी। अगर आपको इस रेसिपी से जुड़ी कोई भी सवाल है तो आप हमसे पूछ सकते है। और हम कोशिश करेंगे की उसे जल्द से जल्द आपको बता दे। धन्यवाद!
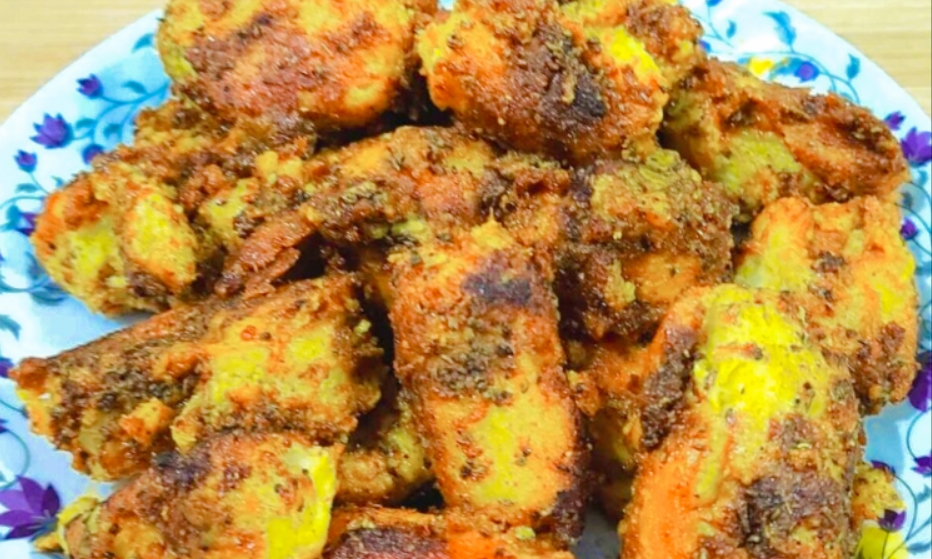
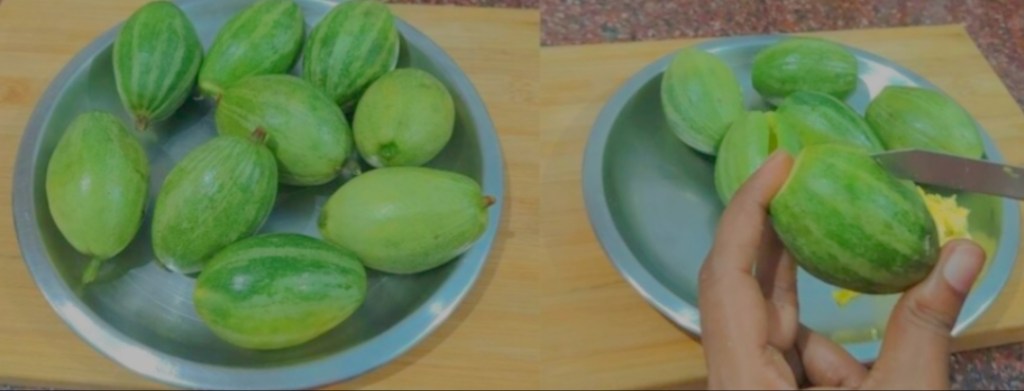
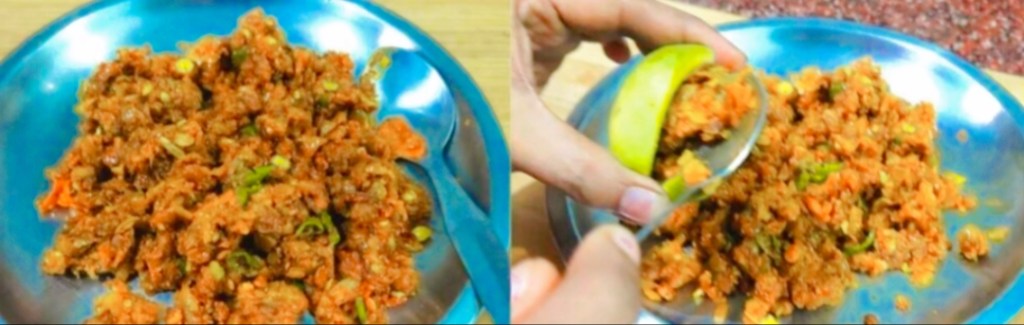
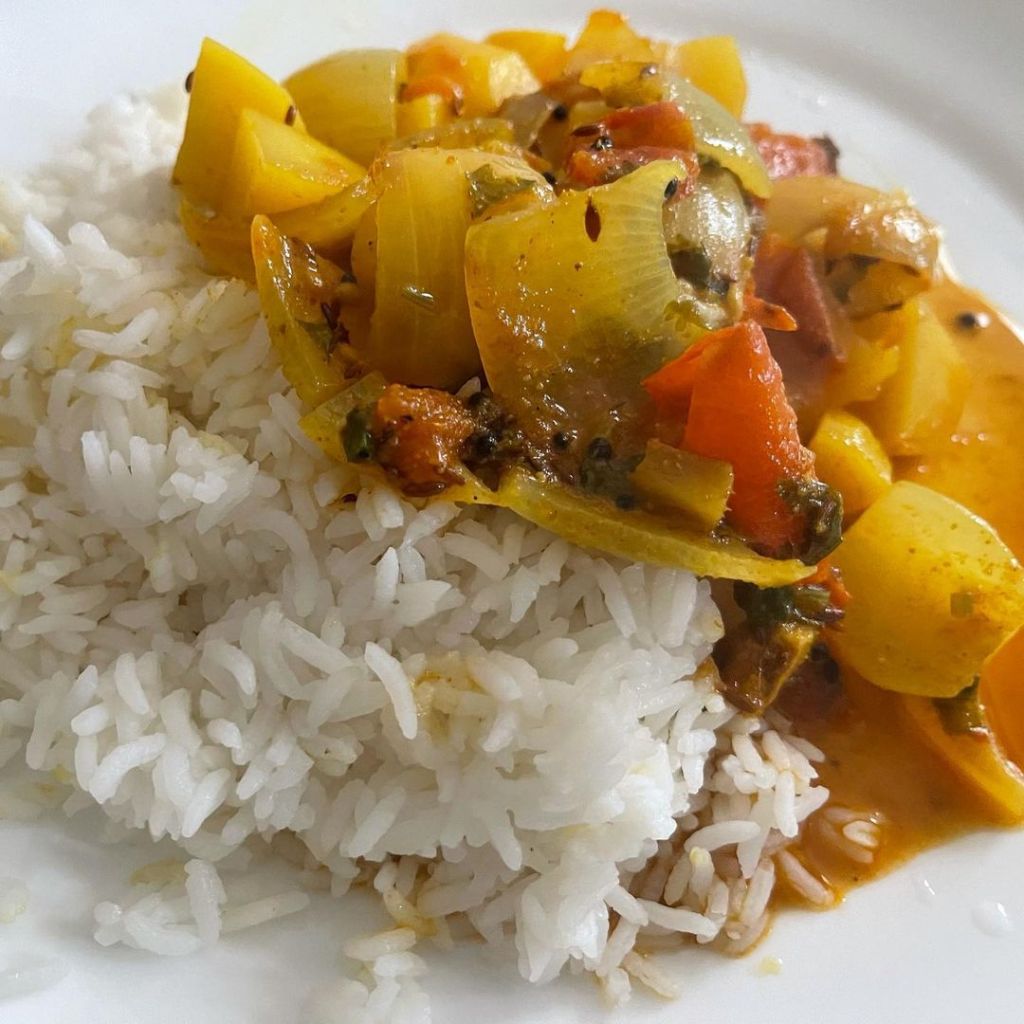
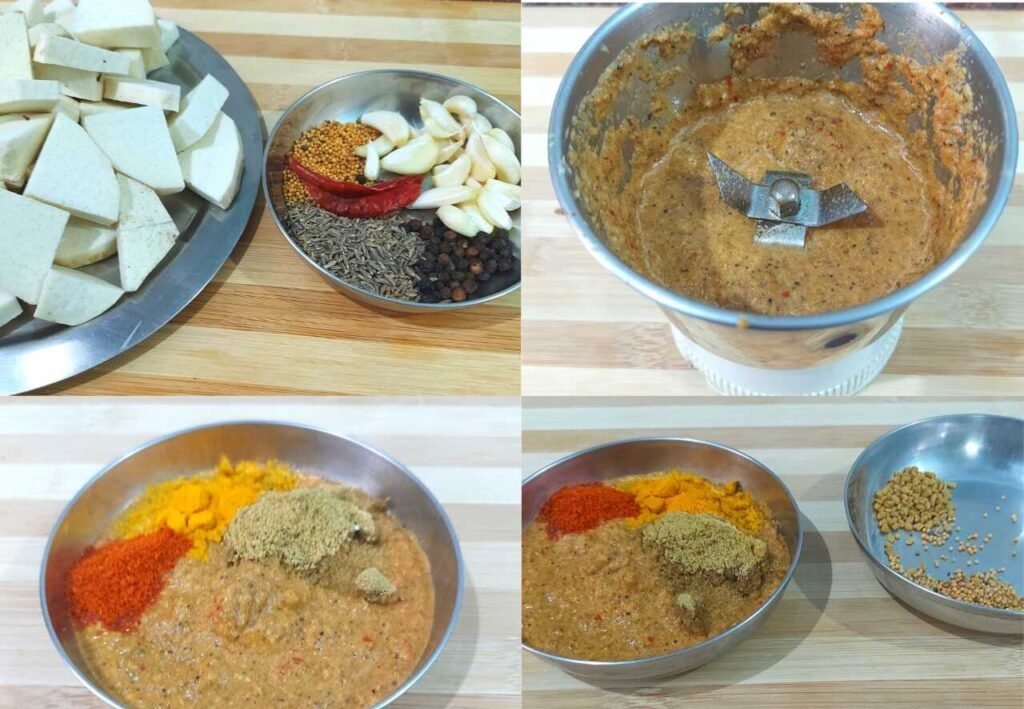
बन्डा की सब्जी (Banda Ki Sabji) किस तरीके से बनाई जाती है आज हम बनाएंगे कंदा की मसालेदार सब्जी (Jimikand Kanda Ki Sabzi) आप भी इस तरीके से बनाये आपको यह सब्जी पसन्द आएगी।
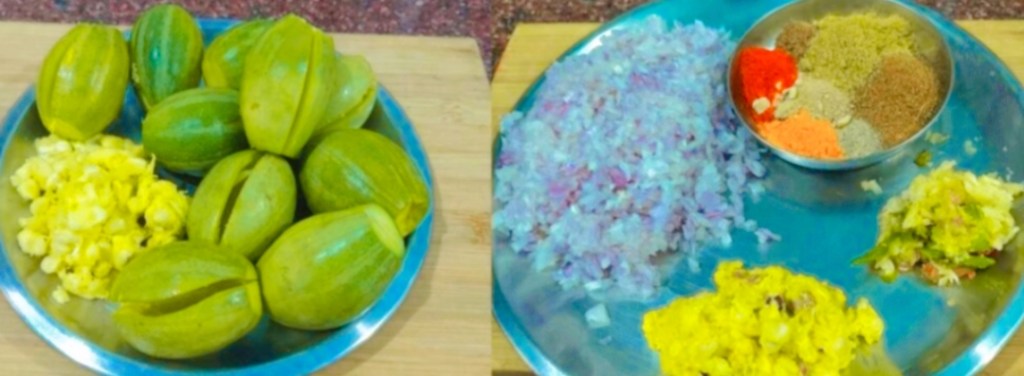
कान्डा – 1 लहसुन – 8 -9 कलिया साबुत लाल मिर्च – 2 सरसों दाना – आधा छोटी चम्मच मेथी दाना – 1/4 टी स्पुन जीरा – 1/2 चम्मच काली मिर्च – 1 टी स्पुन हल्दी पाउडर – आधा छोटी चम्मच लाल मिर्च पाउडर – 1 टी स्पुन या स्वादानुसार धनिया पाउडर – 1 टी स्पुन अमचुर पाउडर -1 टी स्पुन तेल – दो बड़े चम्मच पानी – अन्दाजानुसार नमक – स्वादानुसार
जिमीकन्द की सब्जी बनाने की विधि : How To Make Banda Ki Sabji
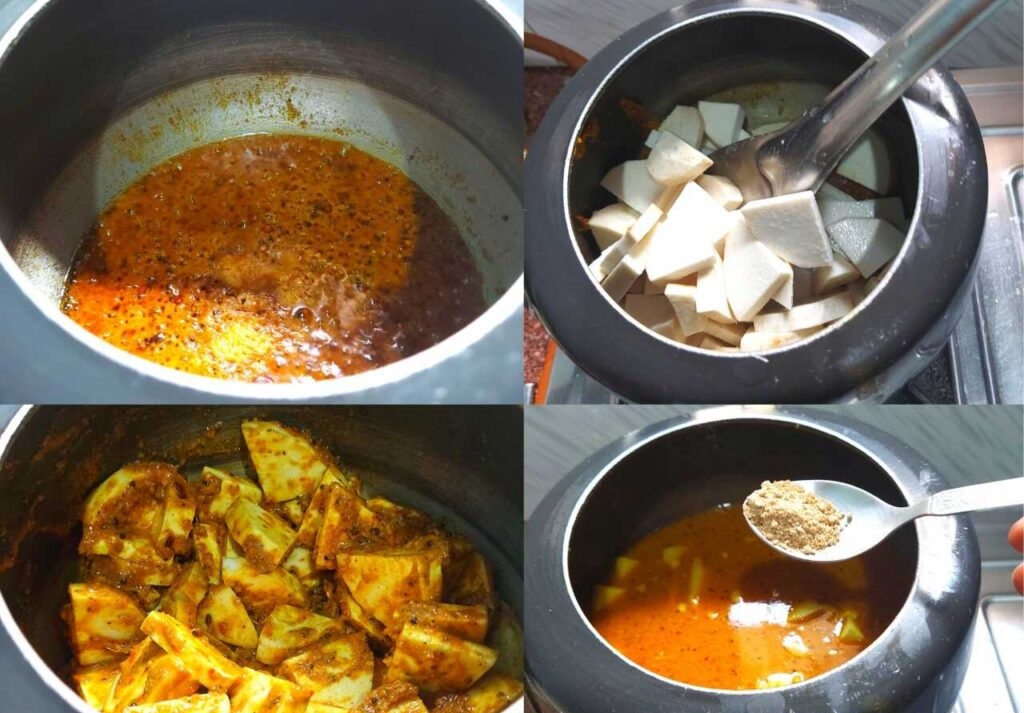
बन्डा को बड़े टुकड़ो में काट ले। अब हमें सरसों दाना और काली मिर्च ,लहसुन, साबुत लाल मिर्च, जीरा का पेस्ट बना लेना है उसमें हल्दी पाउडर लाल मिर्च पाउडर,धनिया पाउडर मिला देंगे। अब कुकर में तेल गरम करे।
जब तेल गरम हो जाये तब उसमें 1/4 टी स्पून सरसों और1/4 टी स्पुन मेथी दाना से तड़का देंगे।
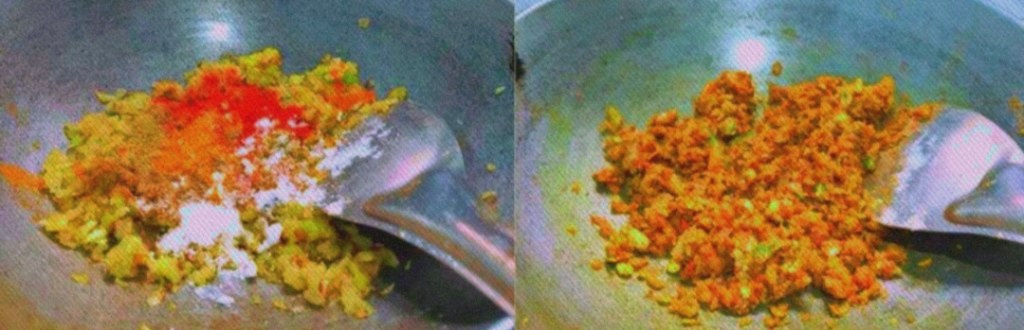
सरसों और मेथी ब्राउन हो जाये तो मसालों का पेस्ट और ,नमक डाल दें और अच्छे से मिक्स करें।
मध्यम आंच पर मसालों को बिच- बिच चलाते हुए ढककर भुनें जब तक कि मसाले से तेल ना छोड़ने लगें।
मसाले भुन जाने पर इसमें कटे हुए बन्डा को पानी से धो कर डाल दें और 2 से 3 और भून ले।
अब एक गिलास या अन्दाजानुसार पानी और अमचूर पाउडर डालकर अच्छे से मिक्स करे अब कुकर का ढ़कन बंद करे 3 से 4 सिटी आने के बाद गैस बंद करे।
बन्डा की सब्जी (Banda Ki Sabji in Hindi) बनकर तैयार है। इसे गरमा गरम रोटी के साथ या फिर चावल के साथ परोसे।
!! धन्यवाद!!
मुझे विश्वास है की आपलोगों को ये रेसिपी बहुत पसंद आयी होगी। अगर आपको इस रेसिपी से जुड़ी कोई भी सवाल है तो आप पूछ सकते है। और मैं कोशिश करूंगा की उसे जल्द से जल्द आपको बता दे। धन्यवाद!
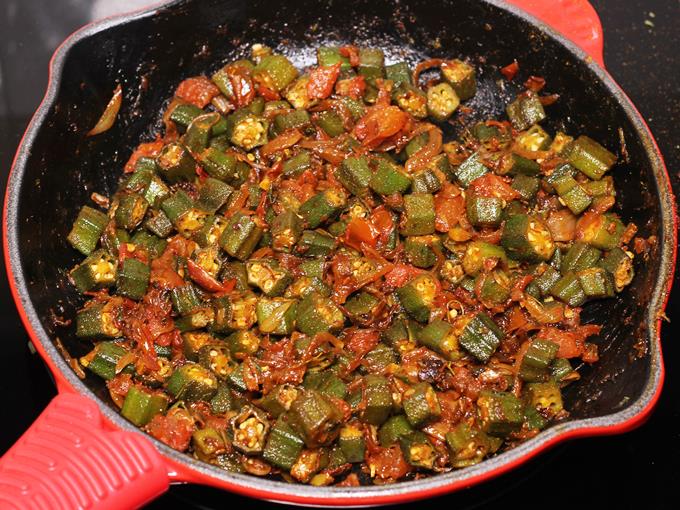
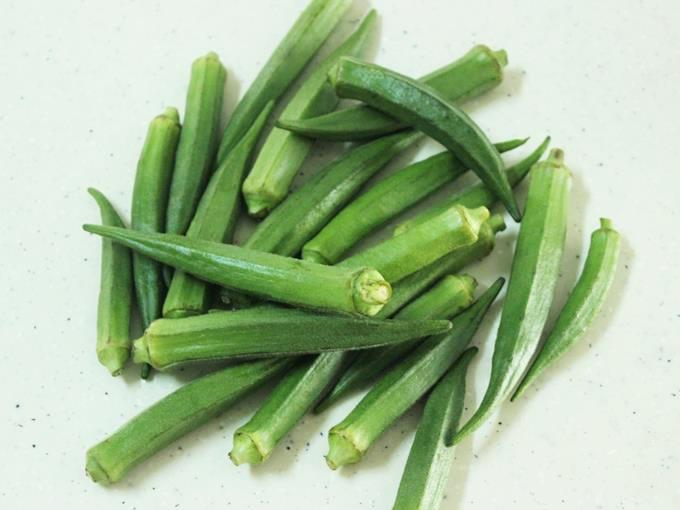
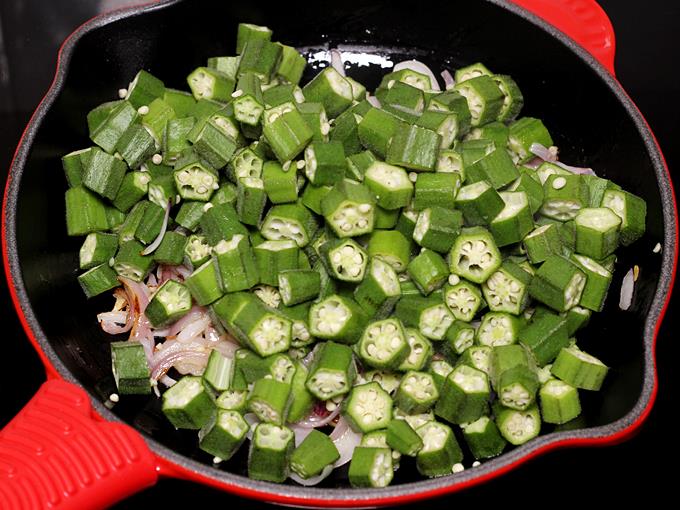
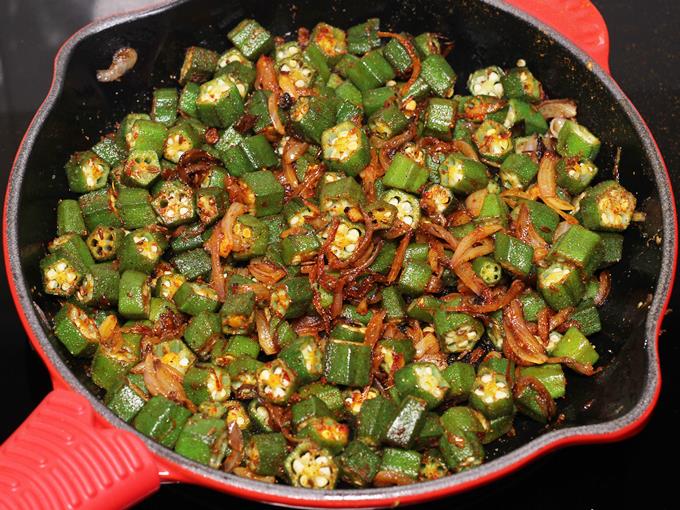
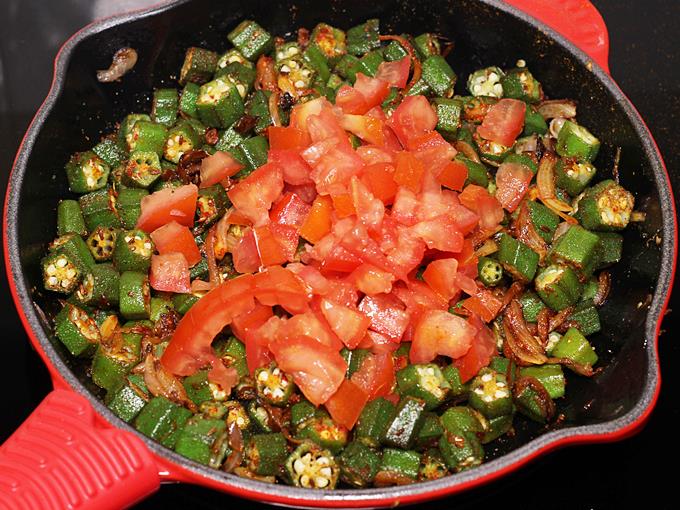
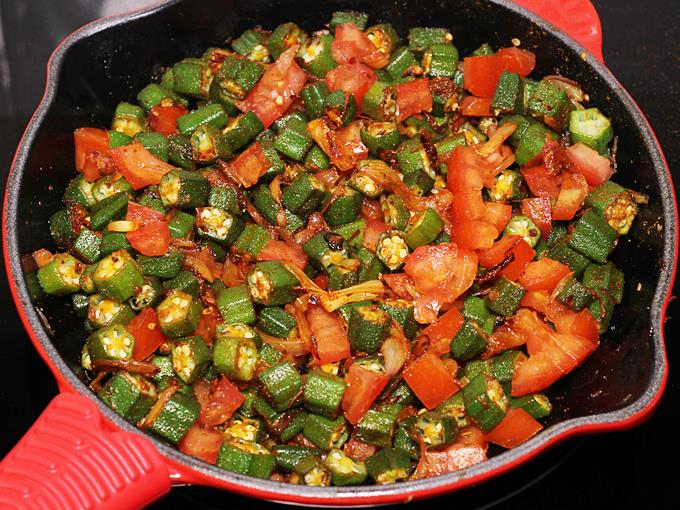
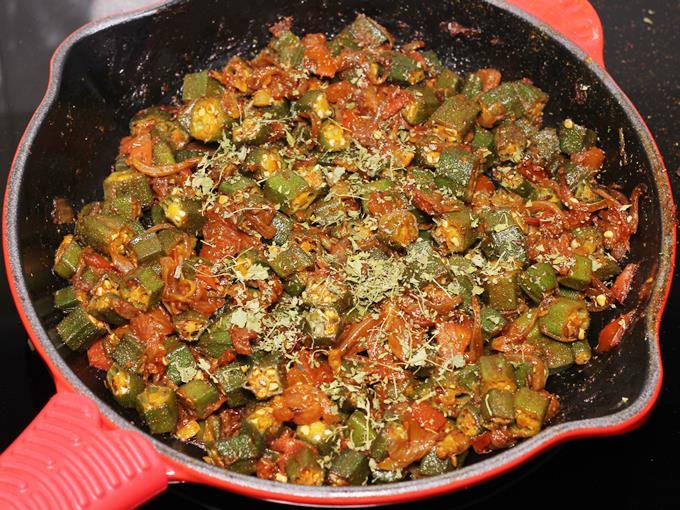
Simple ladies finger dry curry made with okra, spices, onion and tomatoes. This is an easy to prepare sabji and is healthy as well. The dish is mildly spiced yet it tastes very delicious. It goes well with plain rice, roti or even as a side with plain rice and dal. It also goes well in the lunch box. Since it is a dry curry it can also be used as a filling to make chapati or roti rolls.
INGREDIENTS (US CUP = 240ML ) ▢300 grams okra (bhindi – ladies finger) ▢2 tablespoons oil ▢½ teaspoon cumin seeds (jeera) ▢1 tablespoon garlic (1 cloved chopped, optional) ▢1 large onion (sliced, about ¾ cup sliced) ▢1 green chili (slit or chopped) ▢salt as needed ▢½ teaspoon red chili powder ▢½ teaspoon Garam masala (or 1 tbsp pav bhaji masala or sambar powder) ▢⅛ teaspoon turmeric ▢1 large tomato (chopped, about ½ cup) ▢1 tsp kasuri methi (or curry leaves) ▢2 tablespoons coriander leaves (chopped, optional)
How to Make Bhindi Ki Sabji (Stepwise photos) :-
1. Rinse 250 to 300 grams ladies finger under runny water. I spray vinegar and sprinkle some salt. Leave them for about 10 to 20 mins. Rinse them well under running water.
2. Drain them to a colander and let dry them for a while. Wipe off with kitchen tissues or clean napkin. They must not be moist or wet otherwise they will become slimy when you chop.
3. Chop them to half inch pieces and set aside. While you chop, if the knife becomes slimy, wipe off with a kitchen tissue. Then slice 1 large onions (¾ cup sliced). Chop 1 large tomatoes (about half cup chopped) and chop 1 green chili. You can deseed the tomatoes if you don’t like them.
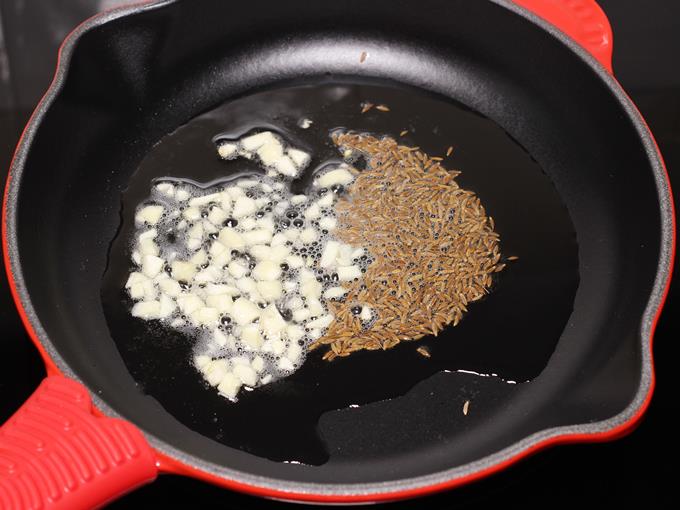
4. Heat a pan with oil. Add half teaspoon cumin seeds. When the seeds begin to splutter add 1 tbsp chopped garlic. Saute just for 30 seconds without browning the garlic.
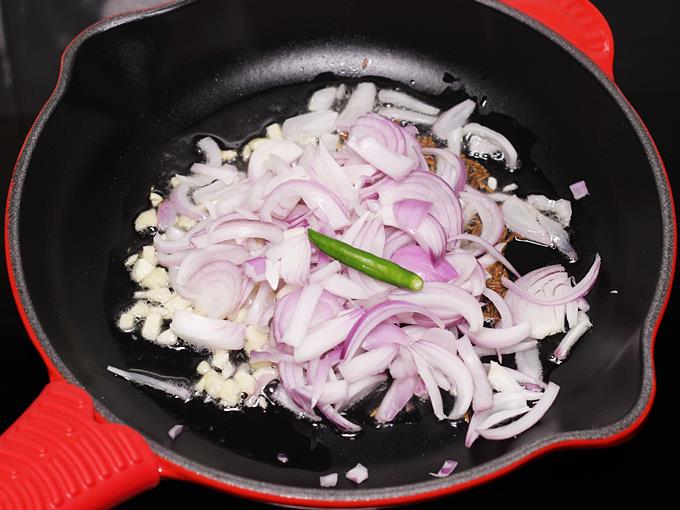
5. Next add in the sliced onions and green chilies.
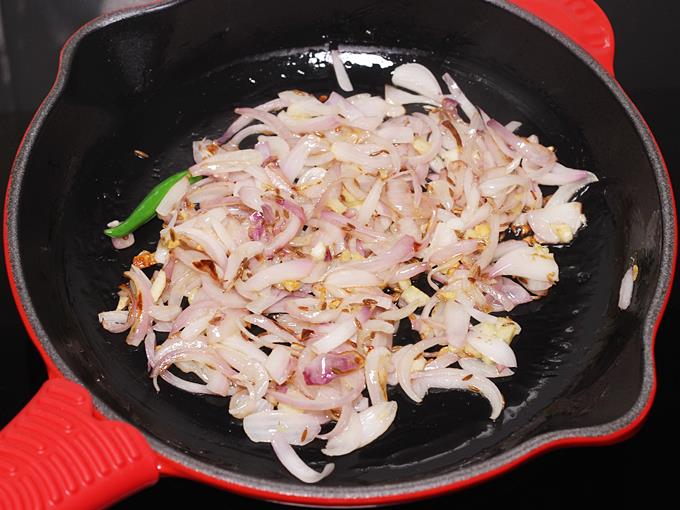
6. Keep strirring and fry them until lightly golden.
7. Add in chopped bhindi.
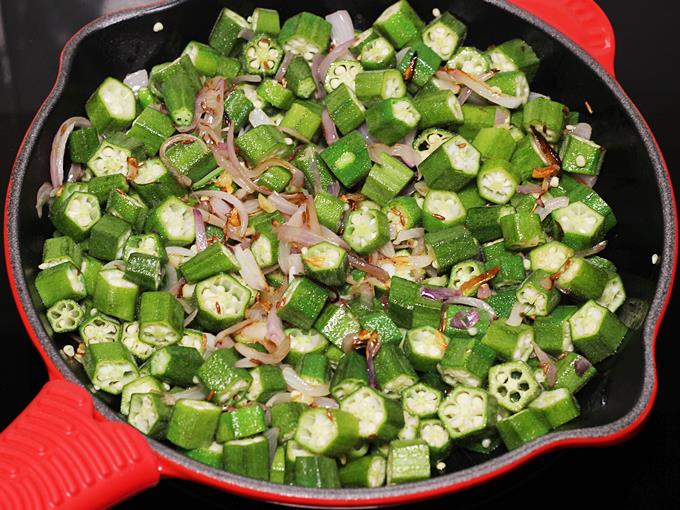
8. Fry them until they are half cooked yet crunchy. But they should not be sticky anymore.
9. While frying stir often but don’t overdo as they become more slimy. Scrape off the bottom gently if it begins to burn. You can also add a tsp of oil to prevent burning.
10. Sprinkle salt. I used half teaspoon Himalayan salt.
11. Next sprinkle 1/8 teaspoon turmeric, half teaspoon red chili powder and half teaspoon garam masala. If you do not like garam masala in this, just add good pav bhaji masala or sambar powder.
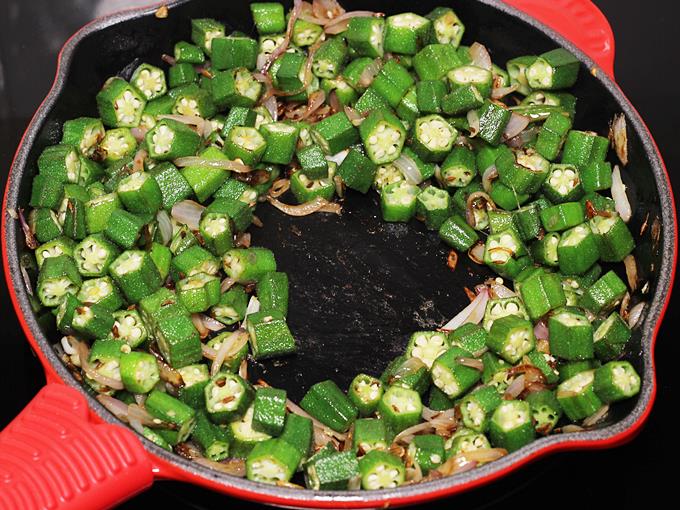
12. Saute for 2 mins.
13. Add chopped tomatoes.
14. Again fry the ladies finger for 2 mins.
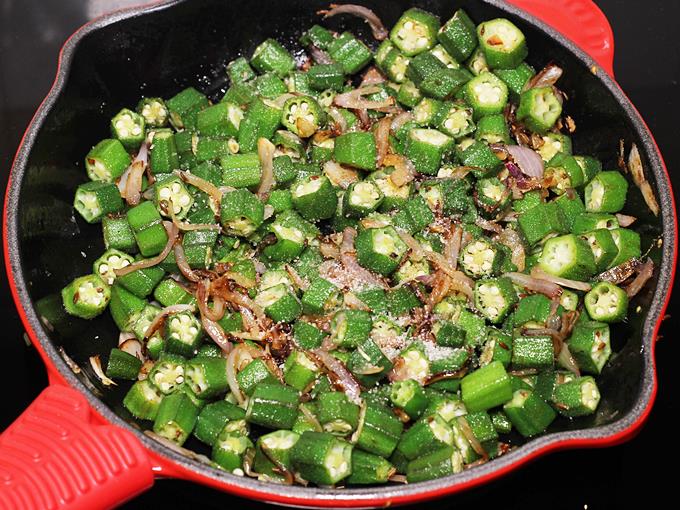
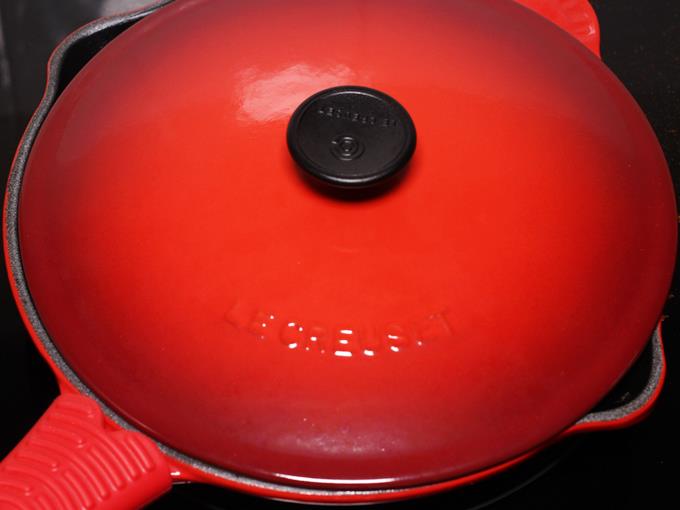
15. Cover and cook till the tomatoes turn mushy & soft.
16. Check the salt and spice. If needed add more salt. Then add 1 teaspoon kasuri methi or curry leaves. Fry for another 2 to 3 mins till the raw smell of tomatoes goes away.
17. If you prefer fully cooked bhindi, then keep mixing and cook until soft. We eat semi cooked bhindi so I turn off early. .
भिंडी की सब्जी को चावल या चपाती के साथ परोसिये और खाइये.
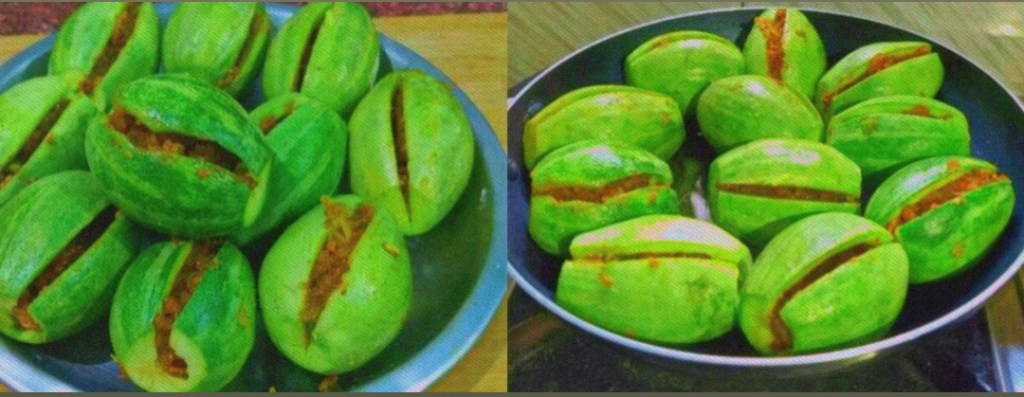
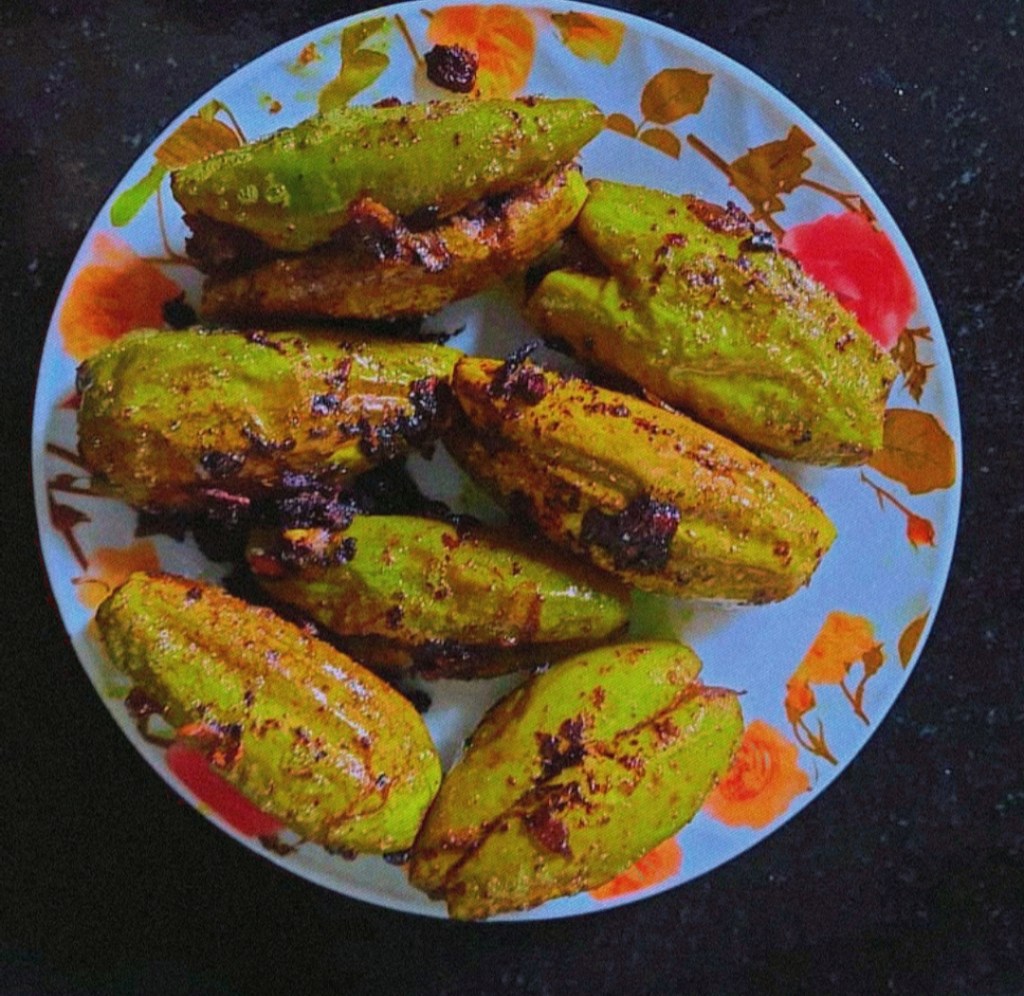
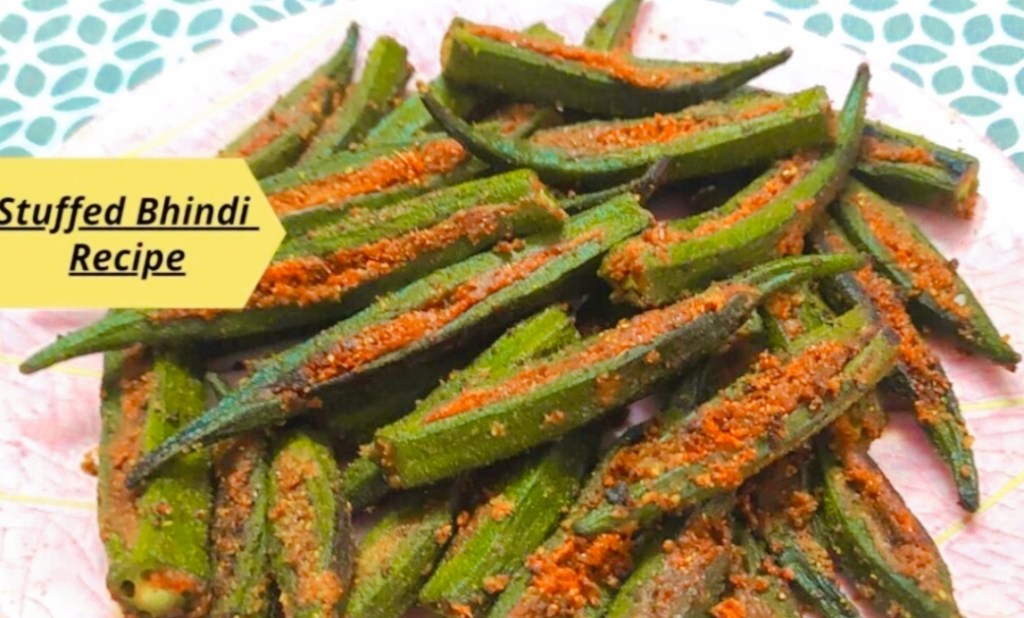
सब्ज़ियों में भरवां सब्जियाँ (Stuffed Vegetables) ज्यादातर लोग पसन्द करते है। भरवां सब्ज़िया कई प्रकार के होते है करेला भरवां (Bitter Gourd Stuffed), बैंगन भरवां (Brinjal Stuffed), परवल भरवां (Parwal Stuffed)आज बनाएंगे भरवां भिन्डी (Stuffed Bhindi) इसे बनाना बहुत ही आसान है। यह मसालों और तेल को मिक्स कर के झटपट बनने वाली भरवां सब्जी है।
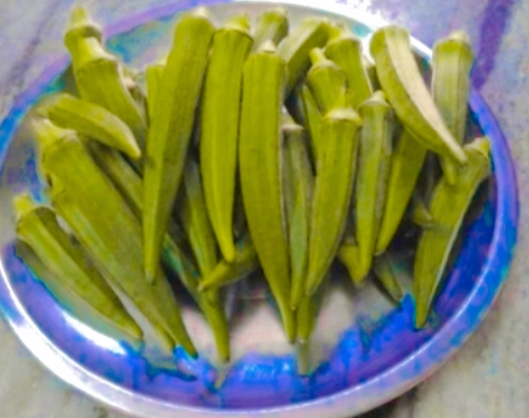
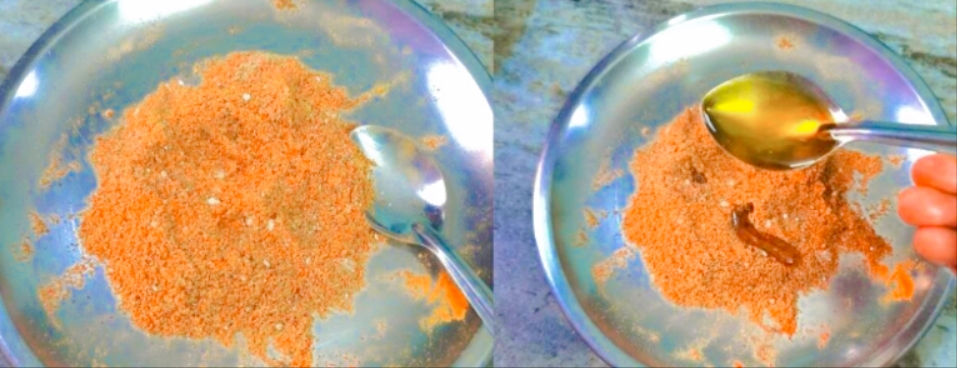
भिन्डियों को धो कर रख लीजिये जब पानी सुख जाये, तो भिन्डियों के डन्ठल काट दीजिये और इसे बीच से कट लगा लीजिये जैसे फोटो में दिखाया गया है।
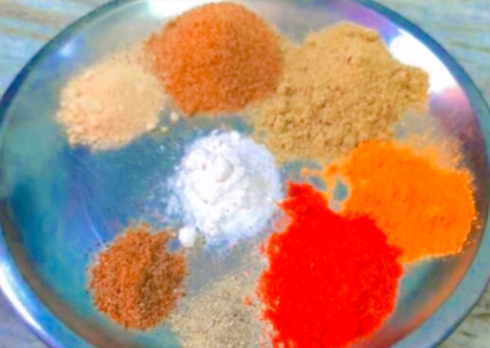
सारे मसाले धनियां पाउडर, जीरा पाउडर, लाल मिर्च पाउडर, हल्दी पाउडर,अमचूर पाउडर गरम मसाला और काली मिर्च पाउडर प्लेट में निकाल कर मिक्स कर लीजिये। फिर दो चम्मच तेल डालकर मसाला अच्छे से मिला लीजिये।
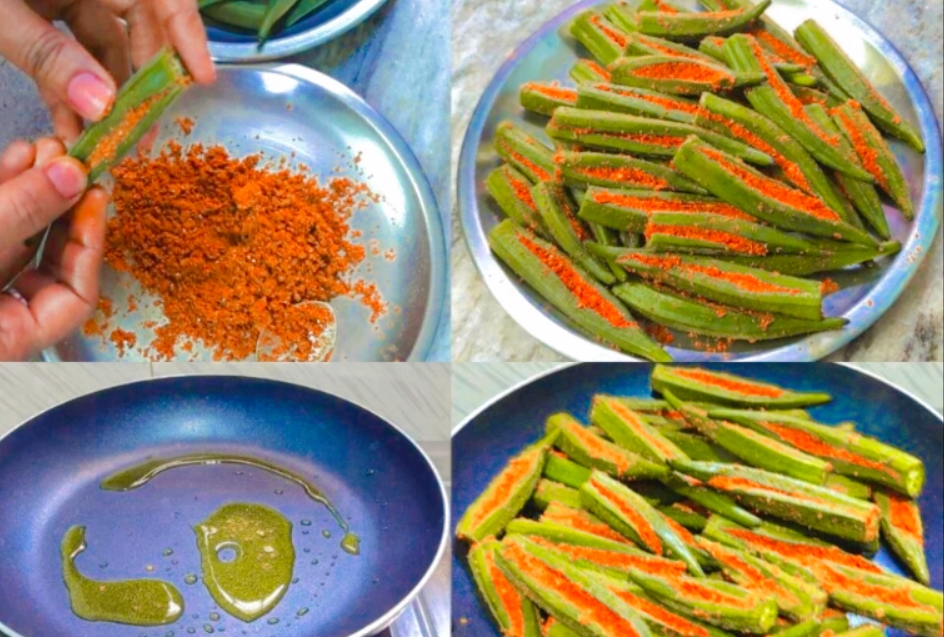
अब इस मसाले के मिश्रण को थोड़ा थोड़ा सारी भिन्डियों में मसाले भर कर तैयार कर लीजिये।
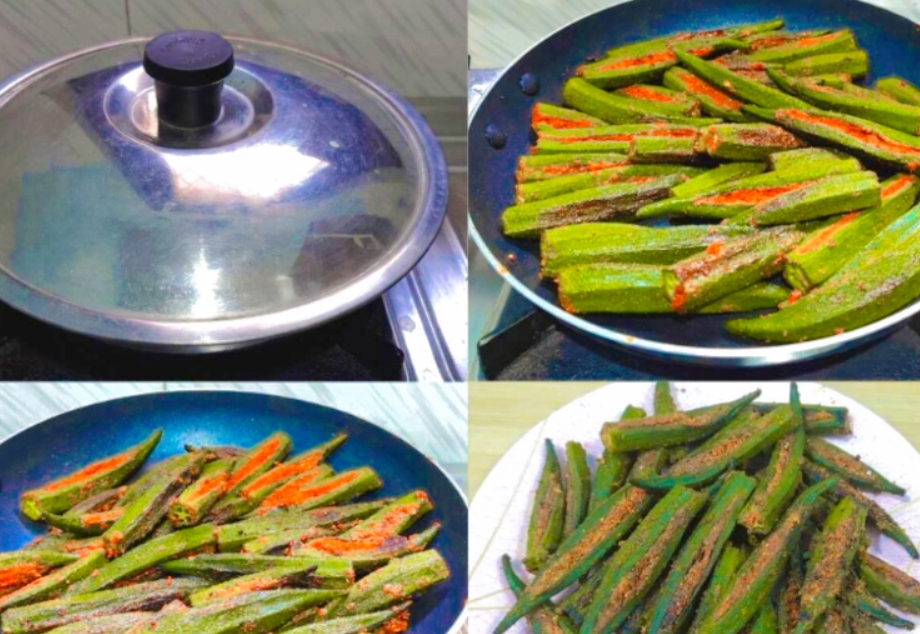
अब पैन में 2 चम्मच तेल डाल कर गरम कीजिये. तेल में हींग और मसाले भरी भिन्डी डालिये और बीच में 2-3 बार चलाते हुए ढककर सिम आँच पर पका लीजिये।
भिन्डी जब अच्छे पक जाये तो गैस बन्द कर लीजिये अब भिन्डी भरवां (Bhindi Bharwa) बनकर तैयार है।
इसे रोटी, दाल-चावल, पराठे के साथ खाने के लिए सर्व कीजिये।
—— सुझाव ——
आप इसमें लहसून का पेस्ट भी डाल सकते है।
ये रेसिपी आपलोगों को पसंद आयी होगी और अगर आपको इस रेसिपी से जुड़ी कोई भी सवाल है तो आप मुझसे पूछ सकते है। हमारी कोशिश रहेगी हम उसे जल्द से जल्द आपको बता दे। धन्यवाद
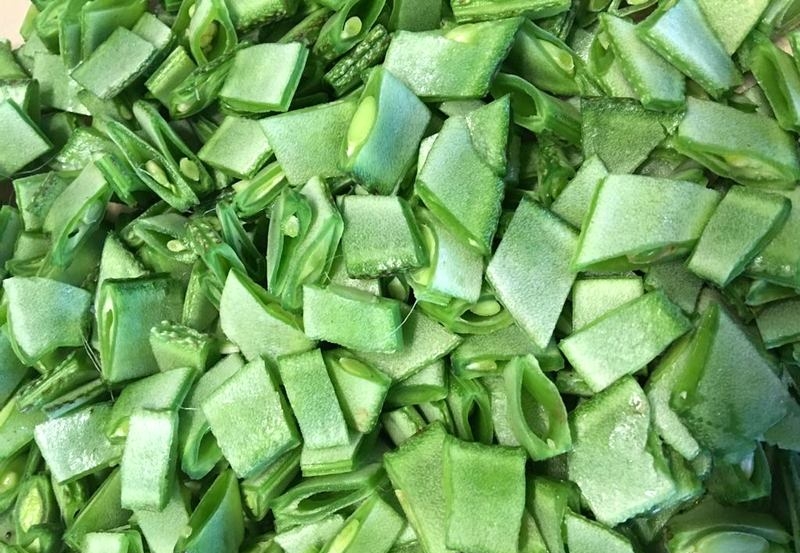
सेम जिसे और भी कई नामों से जाना जाता है जैसे कि सुरती पापड़ी, वेलोर पापड़ी इत्यादि, बहुत ही पौष्टिक सब्जी है. जब हम छोटे थे तब बच्चों को सब्जियाँ खिलाने के लिए कुछ नायाब ही तरीके हुआ करते थे जैसे कि यह पंक्ति- “सेम मटर आलू हम साहब तुम भालू” अब हर कोई साहब ही बनना चाहता है…. सेम सेहत का खजाना होती है. इसमें फाइबर, विटामिन ए, विटामिन सी के साथ ही कई खनिज भी पाए जाते हैं. सेम मटर आलू की यह सब्जी एक बहुत ही आसानी से बनने वाली एक पौष्टिक और स्वादिष्ट सब्जी है जिसे आप पराठा, रोटी, दाल चावल या फिर अपनी पसंद के किसी भी खाने के साथ परोस सकते हैं. तो आप भी बनायें यह स्वादिष्ट सेम मटर आलू की सब्जी और कृपया अपनी राय हमें जरूर लिखें. शुभकामनाओं के साथ
हरी सेम कि फली लगभग 250 ग्राम
आलू 1-2 मध्यम
तेल 2 बड़ा चम्मच
जीरा 1 छोटा चम्मच
हींग 2-3 चुटकी
हल्दी ½ छोटा चम्मच
नमक 1½ छोटा चम्मच /स्वादानुसार
पिसी लाल मिर्च ½ छोटा चम्मच
पिसा धनिया 1½ छोटा चम्मच
अमचूर पाउडर ½ छोटा चम्मच
गरम मसाला ¼ छोटा चम्मच
बनाने की विधि:
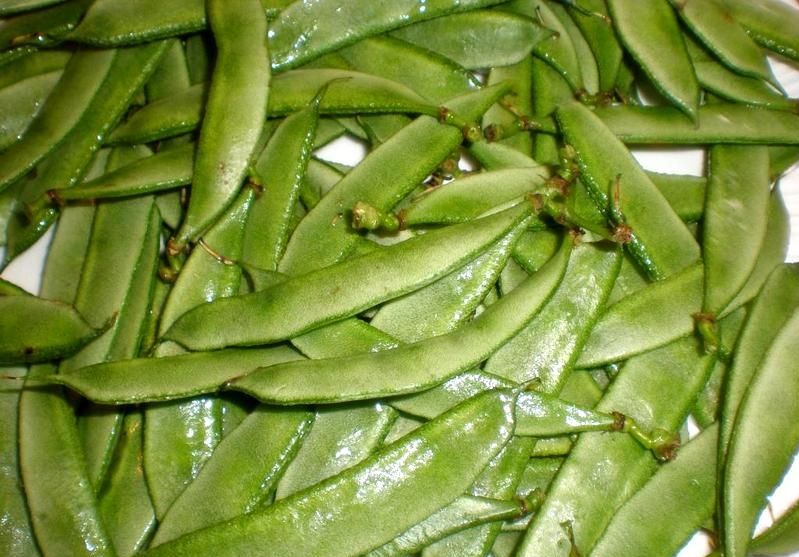
1 नीचे लगी फोटो में सेम कि फली दिखाई गयी है जो कि भारतीय फ्रेंच बीन्स या फिर गवार कि फली से काफी अलग होती है.
2 सेम के किनारे हटा कर, अगर इसमें कोई धागा है तो वो भी हटा दें दनों तरफ से. अब सेम की फली को अच्छे से धो लें और एक साफ कपड़े से इसे पोछ लें. अब फ्रेंच बीन्स को चौथाई से आधा इंच के टुकड़ों में काट लें.
आलू को छीलकर, धो लें और इसे लगभग आधा इंच के टुकड़ों में काट लें.
एक कड़ाही में मध्यम आँच पर तेल गरम करें. अब इसमें जीरा डालें और कुछ सेकेंड के लिए भूनें और फिर हींग डालें.
आँच को धीमा करके हल्दी डालें और फिर सेम और आलू के टुकड़े डालें. सभी सामग्री को अच्छे से मिलाएँ और इसे दो मिनट के लिए भूनें. अब नमक, लाल मिर्च और धनिया पाउडर डालें, और फिर से सब्जी को एक मिनट के लिए भूनें.
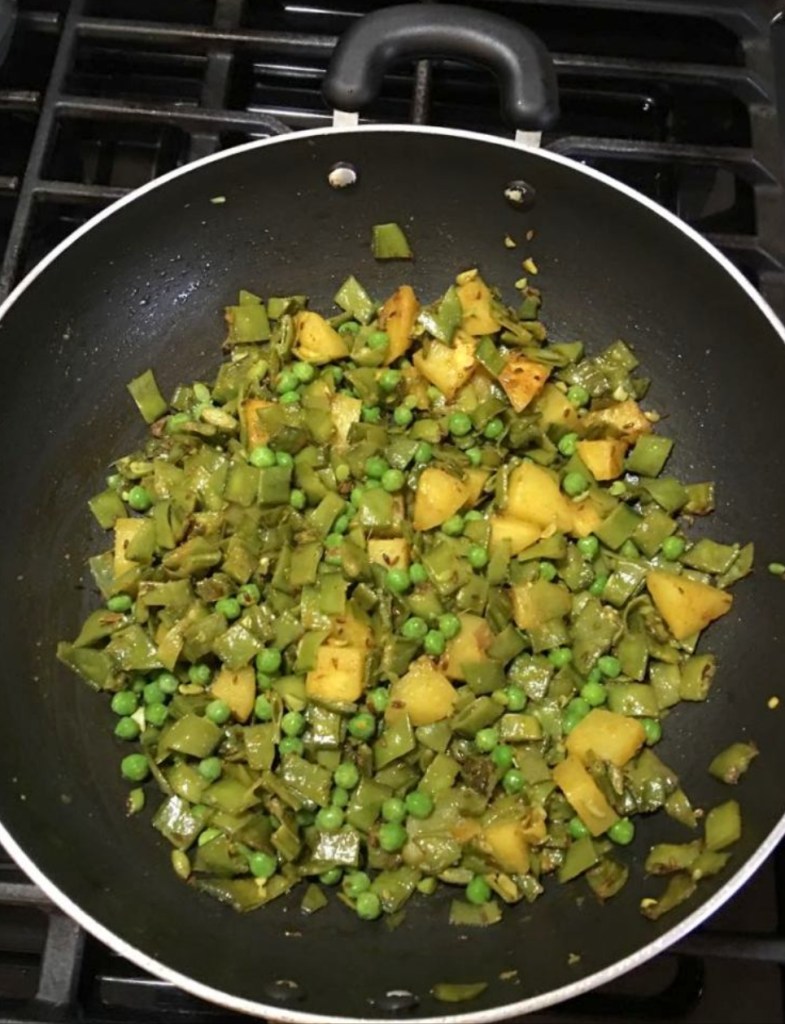
सेम और आलू के ढक कर 6-8 मिनट के लिए या फिर थोड़ा गलने तक पकाएँ.
7 अब इसमें हरी मटर डालें और सभी सामग्री के अच्छे से गल जाने तक पकाएँ. इसमें तकरीबन 5-6 मिनट का समय लगता है.
8 अब सेम मटर आलू कि सब्जी में अमचूर पाउडर और ज़रा सा गरम मसाला डालकर सब्जी को दो मिनट के लिए भूनें. अब आंच बंद कर दें.
9 स्वादिष्ट और पौष्टिक सेम मटर आलू की सब्जी अब तैयार है. इस सब्जी को आप रोटी, पूरी, पराठा या फिर दाल चावल किसी के साथ भी सर्व कर सकते हैं. मुझे या सब्जी प्लेन पराठे के साथ बहुत पसंद है
कुछ नुस्खे/ सुझाव:
जब आप सेम खरीदें तो ध्यान रखें कि यह चपटी हो. चपटी और हरी सेम कच्ची होती हैं और यह आसानी से गल जाती हैं और अधिक स्वादिष्ट लगती हैं. अगर फली पकी होती है तो इसके बीज भी मोटे हो जाते हैं और फली गलती नहीं है.
हरी सब्जियों को ज्यादा नहीं पकाना चाहिए. ज्यादा पकाने से इनका हरा रंग चला जाता है और सब्जी का स्वाद भी उतर जाता है .
हमारे यहाँ सिर्फ़ फ्रोज़न मटर के दाने ही मिलते हैं जो पहले से ही आधे गले होते हैं इसीलिए मैने मटर को सें आलो के आधा पाक जाने पर डाला है. लेकिन भारत में आजकल ताजी मटर बहुतायत में मिल रही होगी तो यदि आप ताजी मटर डालें तो उसे भी सेम और आलू के साथ ही छौंक सकते हैं.
अगर आप तीखे खाने के शौक़ीन हैं तो इसमें कटी हुई हरी मिर्च भी डाल सकते हैं.
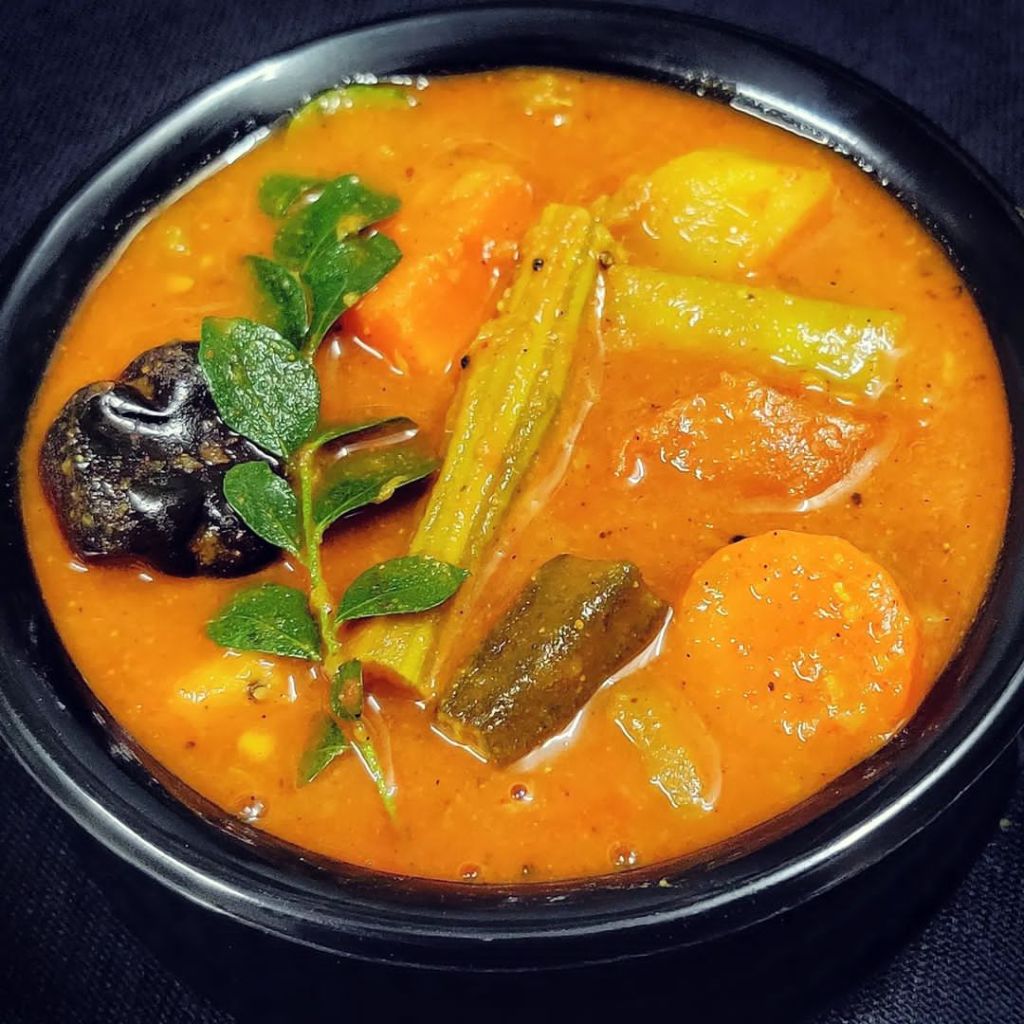
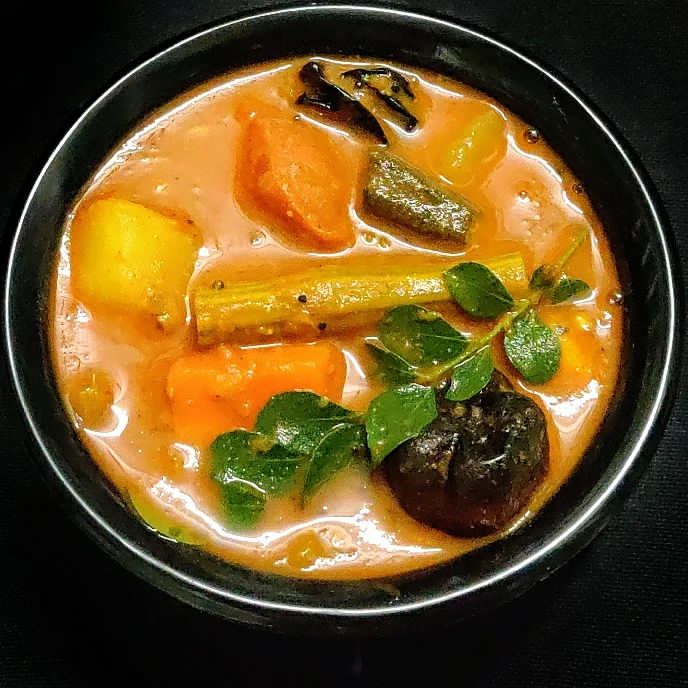
आजकल सांभर को सबको बहुत ही पसंद है। इडली के साथ को इसे बहुत ज्यादा चाव के साथ खाया जाता है। लोग सांभर (Sambar Recipe in Hindi) को बाहर से लाते है पर आज हम आपके साथ घर पर ही मार्केट स्टाइल सांभर बनाने की रेसिपी शेयर कर रहे है। आप इस रेसिपी को जरूर ट्राई करें।
सबसे पहले हम एक बर्तन लेंगे और उसमें तूवर दाल को दाल देंगे और उसमें पानी डालकर इसे 1-2 घंटे भिगोने के लिए रख देंगे।
अब हम एक कङाही लेंगे और उसमें 3 चम्मच तेल डाल देंगे।
जब तेल गर्म हो जाएगा तब हम इसमें जीरा, मेथी दाना, चना दाल, चावल, सूखा धनिया, हींग, इलायची, 2 चुटकीभर हींग, अदरक और लहसून का पेस्ट, 4-5 कङीपत्ता, सूखी लाल मिर्च और नारियल डाल देंगे।
चावल डालने के सांभर बहुत ही ज्यादा चिकना और गाढ़ा बनता है।
इन सभी मसालों को हम कम आंच पर 2-3 मिनट तक भूनेंगे।
जब मसाले भून जाएंगे तब हम मसालों में हल्दी पाउडर, लाल मिर्च पाउडर, नमक और प्याज डाल देंगे।
फिर हम इन मसालों को भी 2-3 मिनट तक भून लेंगे।
मसालों को भूनने के बाद हम इन सभी मसालों को ठंडा करके इसे मिक्सी जार में डाल देंगे।
मसालों में हम थोङा पानी डाल देंगे और मसालों को बिल्कुल महीन पीस लेंगे।
अब हम एक कूकर लेंगे और उसमें 2 चम्मच तेल डाल देंगे।
जब तेल गर्म हो जाएगा तब हम इसमें बारीक कटी हुई हरी मिर्च डाल देंगे।
हरी मिर्च के साथ ही हम इसमें लौकी, मूली और टमाटर डाल देंगे।
यहाँ आप अपने पसंद की कोई भी सब्जी डाल सकते हो जैसे- आलू, भिंडी आदि।
इन सभी सब्जियों को हम 2 मिनट तक भून लेंगे।
2 मिनट भूनने के बाद हम इसमें पिसा हुआ मसाला डाल देंगे।
मसाला डालने के बाद हम इसमें भिगी हुई तूवर दाल और 3 कटोरी पानी डाल देंगे।
जब सांभर में उबाल आ जाए तब हम कूकर के ऊपर ढक्कन लगा देंगे और सांभर को 5 सीटी आने तक पकाएंगे।
Sambar Recipe :-
जब कूकर की 5 सीटी लग जाएगी तब हम गैस की आंच कम कर देंगे और सांभर को 10-11 मिनट तक और पकाएंगे।
10-11 मिनट बाद हम गैस को बंद कर देंगे और कूकर की गैस बाहर निकलने देंगे।
जब कूकर की हवा निकल जाए तब हम कूकर के ऊपर से ढक हटा देंगे।
अब हम फिर से गैस चालू कर देंगे और सांभर में एक उबाल आने देंगे।
जब सांभर में एक उबाल आ जाएगा तब हम इसमें 3 बङे चम्मच इमली और थोङा सा गुङ डाल देंगे और अच्छे से मिला देंगे।
वैसा सांभर लगभग तैयार है परन्तु हम सांभर को और ज्यादा टेस्टी बनाने के लिए सांभर में एक बार तङका और लगाएंगे।
सांभर को हम गैस से नीचे उतार देंगे और गैस में एक कङाही रख लेंगे।
कङाही में हम 2 चम्मच तेल डाल देंगे।
जब तेल गर्म हो जाएगा तब हम इसमें सरसों के दाने, 3-4 साबुत लाल मिर्च, 1 चुटकीभर हींग और 2-3 कङी पत्ता डाल देंगे।
इन सभी चीजों को हम भून लेंगे।
जब ये सभी चीजें भून जाए तब हम इस तङके को सांभर में डाल देंगे।
सांभर को अच्छे से मिक्स करने के बाद हमारा सांभर बिल्कुल तैयार है।
सांभर को सर्व कैसे करें
अगर आप इडली को सांभर के साथ सर्व कर रहे है तो आप सांभर को एक कटोरी में निकाले और उसमें 2 इडली डालकर इसे 10 मिनट तक पङा रहने दे। इससे इडली में सांभर का बहुत अच्छा स्वाद आता है। आप सांभर को डोसा के साथ भी सर्व कर सकते है। सांभर के साथ आप नारियल की चटनी और पुदीना की चटनी भी सर्व कर सकते है। आप इस रेसिपी को जरूर ट्राई करें।
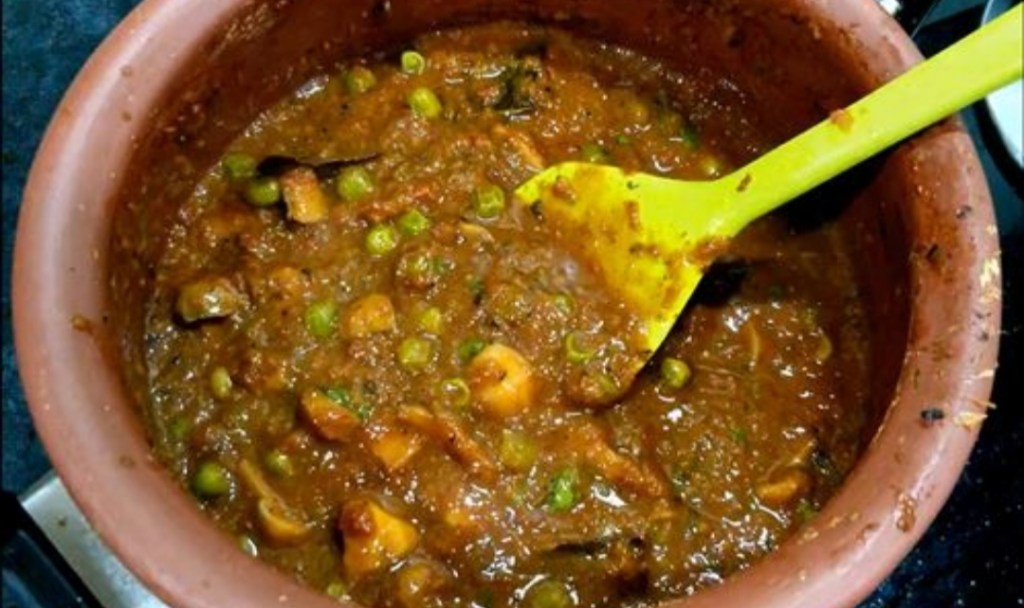
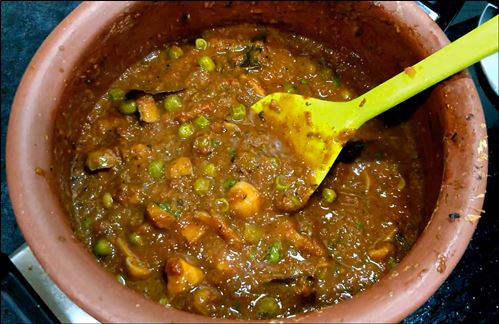
Mushroom Matar Recipe with step by step photo and video recipe. This Indian curry is spicy and tangy prepared in onion tomato gravy.
This is one of my favorite Mushroom recipes. The juicy mushrooms along with the sweetness of peas in spicy, tangy and creamy onion tomato gravy makes it so delicious.
This Indian curry goes well with lachha paratha, tandoori roti, tawa roti or naan. I even like to pair it with some steamed rice and onion salad.
1. Prepared in Onion-Tomato based gravy
2. Vegan and gluten-free
3. An easy Indian Curry recipe
4. Made with easy pantry staples
5. Restaurant Style
6. Spicy and Tangy
4 Tbsp Oil Whole Spices (Bay Leaf, Cloves, Cardamom, Cinnamon) 2 Tbsp Ginger, Garlic, Coriander & Green Chilli (Coarsely Grounded) 1/2 Cup Onion Puree 1/4th Tsp Turmeric Powder 1 Tsp Red Chilli Powder 2 Tsp Coriander Powder 1/2 Tsp Kashmiri Red Chilli Powder 1/2 Tsp Kasuri Methi Salt to taste 1 Cup Tomato Puree 2 Tbsp Roasted Besan 2 Tbsp Malai (Fresh Cream) 1/4th Tsp Garam Masala Powder 1/2 Cup Boiled or Frozen Peas 200 gms Mushroom
How to prepare for Matar Mushroom Recipe –
Clean mushrooms well. Use them while they are still fresh. Thaw the peas if using frozen and peel if using fresh.

Make onion and tomato puree separately. Also make a coarse paste of coriander, chilli, ginger and garlic.
How to clean mushrooms?
Transfer the mushrooms in a bowl, sprinkle whole wheat flour or salt generously. Taking one mushroom at a time, scrub all over nicely to remove the dirt. Wash under running water.
If required peel the skin and trim the edge. Mushrooms are now ready to use.
How to make Mushroom Matar Recipe at Home –
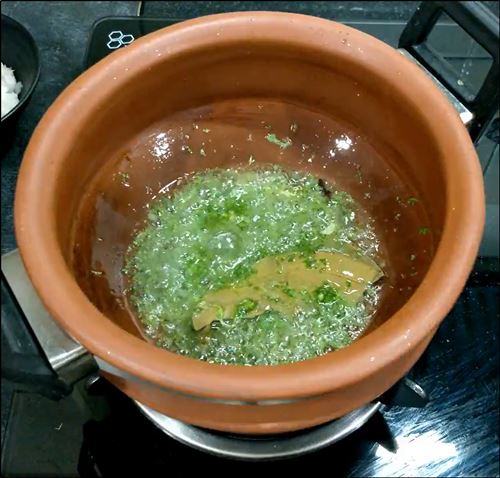
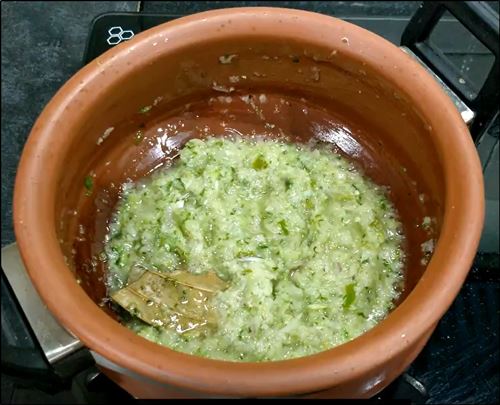
Heat oil, add whole spices, next add ginger, garlic, coriander and chilli paste. Cook and then add finely chopped onion. Cook till golden brown.
Add powdered spices to flavour. Mix everything well. Now add tomato puree and let it cook till oil starts to separate.
Now add roasted besan and cream, garam masala powder and give it a nice mix.
Add in mushrooms and peas, also add water. Mix well and let it cook.
Finish with coriander leaves.
Things to keep in mind while making Mutter Kumbh Recipe –
1. Make sure to clean mushrooms well. 2. Do not soak mushrooms in water. 3. If using fresh peas, boil them before adding. 4. The gravy should be well cooked, it should start leaving oil from the sides and turn darker red in colour. 5. Roasted besan gives a nice binding to the gravy and adds a creamy texture. 6. Make fresh ginger, garlic, coriander and chilli paste in mortar pestle for best taste. 7. Cook the onions on a low flame till golden brown. The slow caramelizing brings out the taste better.
Step by Step Recipe of Matar Mushroom –
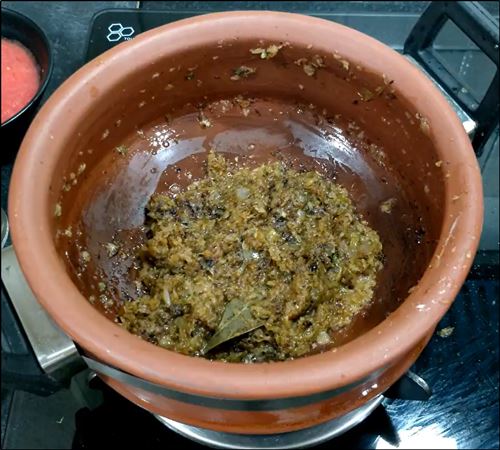
Heat oil in a pan (I use my clay pot), to it add whole spices.Next, add ginger, garlic, coriander and chilli paste.
Cook for a min. and then add onion puree.Let it cook on a low flame till it turns golden brown. Keep stirring in between to prevent it from sticking to the bottom of the pan.Now add turmeric powder, red chilli powder, coriander powder, salt, kashmiri red chilli powder and kasuri methi.
Give everything a nice mix.
Next add tomato puree and mix well.
Cover and cook for 6-8 mins. on a medium flame. Keep stirring in between.
Uncover and cook till it starts to leave oil from the sides.
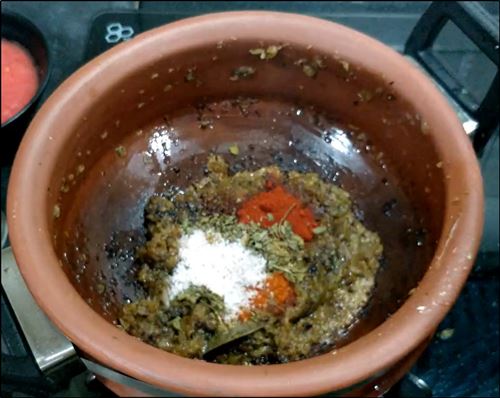
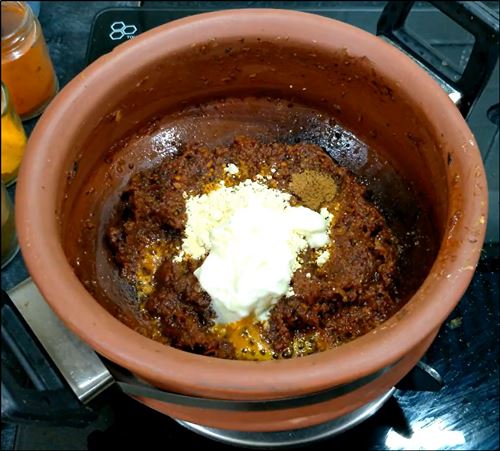
Now add roasted besan, malai (or fresh cream) and garam masala powder.
Give it a nice mix.
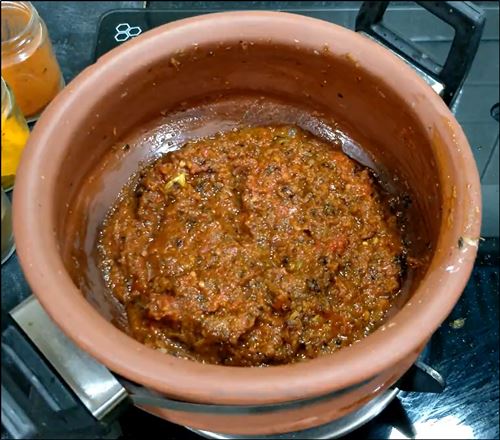
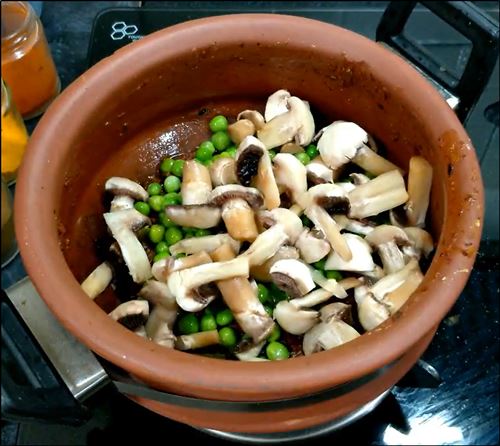
To the gravy, add peas and mushrooms. Mix well.Add water as per required consistency. Give it a nice mix.
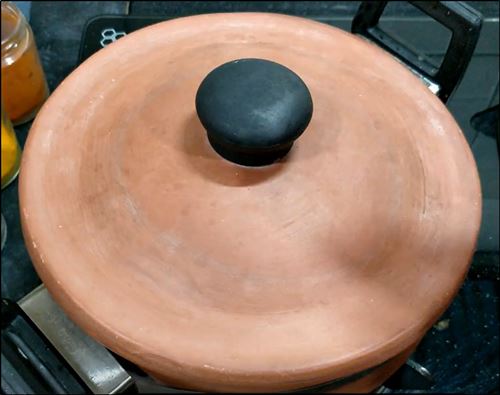
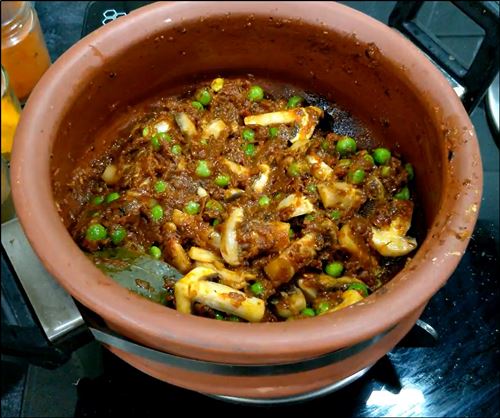
Cover and cook on a low flame for 4-5 min. Stir in between.
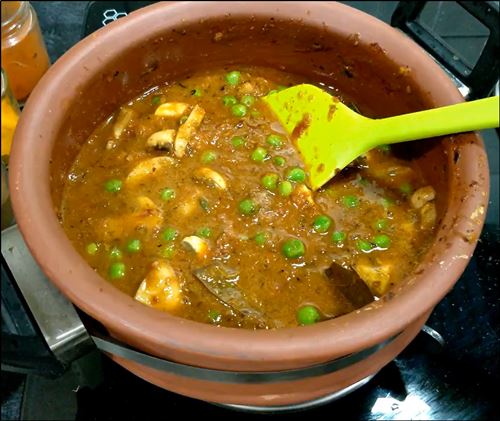
Finish with coriander leaves.
Serve hot with roti, naan or paratha
How to serve Matar Mushroom Masala – This recipe of Matar Mushroom Masala goes well with roti, paratha or rice.
To make a complete meal for guests, add mushroom ghee roast and hara bhara kebab for the starters. For the main course pair it with tandoori roti, salad, jeera rice and raita.
If you try this recipe, please do let me know in the comment section. I would be happy to receive your feedback on my Social Media
NOTE
• The onion-tomato masala is the key to this recipe, make sure it is well cooked. • Boil the peas if using fresh ones. • Do not cut and mushroom beforehand, else it will turn black. • Adjust the spices as per taste.
Leave a Reply
Your email address will not be published. Required fields are marked *
Beyond Eating
Food for me is love and cooking is my passion. The purpose of this blog is to connect with foodies worldwide and share food stories through means of recipes and reviews.
Follow us on Instagram for quirky insights on my small world that revolves around food :- INSTAGRAM